First of all, It is 17th February 2020. This means that Ubuntu Focal Fossa is not ready. We’ll have to wait for another 2 months before the new Ubuntu 20.04LTS is released. This is OS is not stable yet, so it is not recomended: There might be bugs, problems can be expected, etc.
I have a Macbook PRO 2016 13″ which I hardly use. However, just for fun I installed a new Ubuntu 20.04 Foca Fossa and it is working reasonably well. I have WIFI, the keyboard and trackpad works perfectly from scratch. I’m happy with it.
There are a few things that doesn’t work: Bluetooth, sound and Video Camera. The truth is that I really don’t care much about Bluetooth and Camera since this is a makeshift solution while HP technical service solves some problems with my HP laptop’s battery. However, I’d like to have some music while I’m working. I just bought an adaptor USB-C to Jack for less than 10€ and I can listen .
F-Keys Not Working Properly
However, there is something I didn’t like: When I pressed any F-keys the behavior was not the one I desired. Instead of acting like an F-Key, it happened turn my volume up or down and all that stuff I want to do when I press “fn”+Fx.
Some weeks ago, I wrote something about iSCSI. This is a way to show a remote disk in another server as if it was a local disk. You need to care in you client about everything: It is basically like another disk for the initiators.
On the other hand, you can choose using NFS which is a different approach: The server exports the Filesystem (directory or whatever) and it is mounted remotely in the clients. So, the “internals” about the filesystem are managed in the server and not in the client. I only mean that the approaches are different, I don’t want to discuss which one is better. Anyway, the question should be something like “which one is better for what?”.
In this example, I’d like to explain how we can install and use NFS both in our client and our Server
NFS Server
The installation is simple:
apt-get install -y nfs-common nfs-kernel-server
Once we have installed that software, we only need to think what we want to export, and write that in “/etc/exports” file. For example, let’s imagine we create a new folder /exports/nfs and I want to export that, then I should add the following line to /etc/exports file:
/export/nfs *(rw,no_root_squash)
and reload the nfs-kernel-server:
sudo systemctl reload nfs-kernel-server
That was pretty easy.
NFS Client
The installation of the client side is even easier than the installation in the server:
sudo apt-get install -y nfs-common
And in order to mount the /export/nfs which our NFS server is exporting, we only need to run the following command (my NFS_SERVER_IP is 192.168.192.10):
sudo mount -t nfs ${NFS_SERVER_IP}:/export/nfs /mnt
Of course, we might want to mount that directory at startup. So we must change our /etc/fstab file adding this line (knowing that my NFS_SERVER_IP is 192.168.192.10):
iSCSI (Intenet Small Computer Storage Interface) implements SCSI protocol over a TCP/IP network. SCSI was a standard interface to transfer data in a computer bus. So iSCSI is a way to Store and Retrieve data from a remote disk as if it were a local Disk. It can be uses as a kind of Storage Area Network.
It is rather ease to install both the server (called iSCSI Target) and the clients (known as iSCSI initiators). As in title this is just some kind of divertimento. I’m quite experienced with Openstack thus I want to emulate some kind of simplification of the use of iSCSI using LVM as Openstack Cinder Volume does.
So, my first step is using a disk with LVM and create a volume group as explained in the first post I wrote related to LVM:
pvcreate /dev/vdb
vgcreate krtvolumes /dev/vdb
Install the Target
sudo apt install tgt
Great… the target is working now. That was easy (of course we might want to add further configurations, but not now).
Install the Initiators
sudo apt install open-iscsi
That’s the way to install the initiator software, that is, the software for the clients.
Adding volumes to our target
I’ve written a simple script which creates LVM device, adds the device as a new target and exports it. This script must be run as root.
# Creates a new Logical Volume with lvcreate.
# The name is krtvol and a generated ID.
volumeGroup=krtvolumes
volId=krtvol-$(uuidgen)
iqn=iqn.2020-01.eu.jicg
size=${1:-1}G

lvcreate -L ${size} -n ${volumeGroup}/${volId}

# lastId is a file containing a number as Last Target ID
thisId=$(($(cat lastId) + 1))

# Creates a new target using the LV previously created
tgtadm --lld iscsi --mode target --op new --tid ${thisId} -T ${iqn}:${volId}

# Gets the device file name from the volId (changing every - for --)
deviceFile=/dev/mapper/${volumeGroup}-$(echo ${volId} | sed 's/-/--/g')

# Adds the new target so it can be found
tgtadm --lld iscsi --mode logicalunit --op new \
  --tid ${thisId} --lun 1 -b ${deviceFile}

# formats it using ext4
mkfs -t ext4 ${deviceFile}

# Sets the new last targret Id in the "counter" file.
echo -n $thisId > lastId

# echoes the name of the target
echo ${iqn}:${volId}
Using that simple script we can add a new volume, formatted with ext4 to our scsi target.
In my example the IP address of my iSCSI target is 192.168.192.10 and using that small script, I got a volume which ID is: 70f370fc-5954-4d2e-a3ff-fccfb57caf2
Setting up volumes in our Initiator
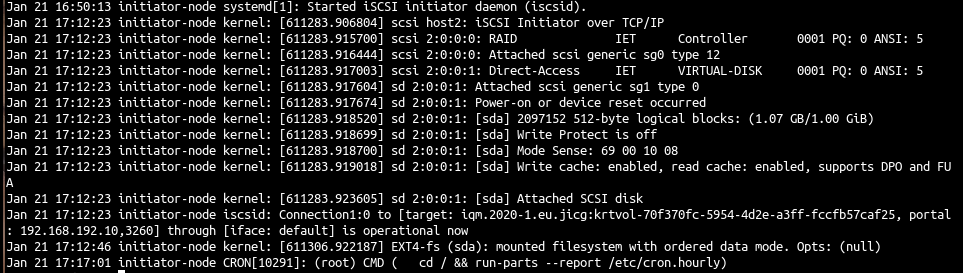
I know that mi iSCSI IP is 192.168.192.10 — So from my initiator node I can query the tgtd server this way:
sudo iscsiadm -m discovery -t st -p 192.168.192.10
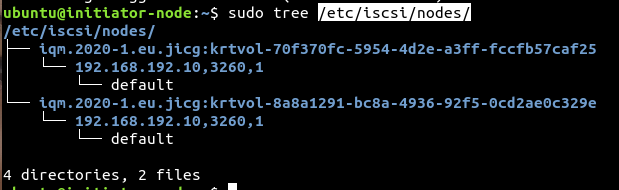
When we run that command, it is created an structure tree accesible only by root. We can see that structure with the tree command so we can get a grasp of it: sudo tree /etc/iscsi/nodes/
Later, we’ll make some changes in the default file belonging to one of the targets we’ve discovered.
I see that the VolumeID was “70f370fc-5954-4d2e-a3ff-fccfb57caf25” . So, from the Initiator (client) I can type the following command:
And finally, I set the connection automatillay in the file describing the initiator, so iscsiadm connects to it when the daemon starts:
sudo sed -i 's|manual|automatic|g' /etc/iscsi/nodes/iqm.2020-1.eu.jicg\:krtvol-70f370fc-5954-4d2e-a3ff-fccfb57caf25/192.168.192.10\,3260\,1/default
This “weird” directory structure is shown previously in this article.
So, whenever we restart open-iscsi service an initiator would be started to this exported volume. And as it is in our /etc/fstab file, it would be automatically mount in /mnt.
Unconnecting the Initiator
Of course the remote disk should be disconnected with care. We need to umount the disk and “logout” the initiator:
Once done this, we can delete de Logical Volumes we’ve created in order to clean everything.
We can use the command lvs to see the volumes we’ve created, and the command to remove one of the volumes (the one we’ve been using through this example) is:
There is an interesting feature in Linux: The implementation of Logical Volumes using LVM (Logical Volume Manager). This implementation manages 3 concepts:
Physical Volumes, corresponding, basically, to physical disks or partitions.
Volume Groups which are an agregation of several Physical Volumes.
Logical Volumes which resembles disk partitions and which are contained in a Volume Group.
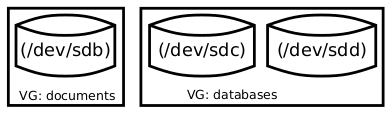
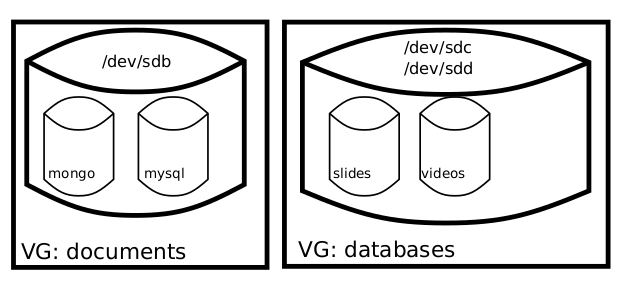
Let’s consider a simple example. Let’s imagine we have 2 disks which are named in Linux with /dev/sdb and /dev/sdc and /dev/sdd
We can convert those 2 volumes in Physical Volumes to LVM using the pvcreate command. This commands initializes a physical volume (PV) so it can be recognized to be used by LVM.
Great, we can check our PVs using the command pvscan.
Once we’re done with this initialization, we’d like to create some new groups of volumes. In this case, I’ll create the groups named “databases” and “documents” (or whatever valid names you can think of) using the command vgcreate.
So, now we have 2 Volume Groups (VG): documents and databases
Using the command vgs we can get some basic information about our Volume Groups:
There’s only one step before we can use our disks: Creating the Logical Volumes (LV) using the command lvcreate. So, let’s do:
# Create a LV for Mongo. 25% del VG databases
sudo lvcreate -l 25%VG -n databases/mongo

# Create a LV for MySQL, 3Gb (Look the equivalent syntax with -n)
sudo lvcreate -L 3G -n mysql databases

# Another 2 LVs for videos and presentations in VG documents
sudo lvcreate -L 10G -n documents/videos
sudo lvcreate -l 20%VG -n documents/presentations
Now we have our Logical volumes in our Volume Groups… One day I’ll learn about drawing good graphics… but not today.
We can see what we have using lvs command:
Using the Logical Volumes
Yes, it is great to have logical volumes… if we could use them. In fact it is easy to use them and mount them at startup. LVM is a device mapper, this means that this Logical Volumes that we have created are mapped as devices in /dev/mapper:
We should format the devices:
for a in databases-mongo  databases-mysql  documents-slides  documents-videos; do
sudo mkfs -t ext4 /dev/mapper/${a}
done
So the devices are ready to be used, and mount them. Let’s mount a couple of those Logical Volumes by adding a couple of lines in our /etc/fstab file:
After adding these 2 lines, we can mount the directories:
sudo mkdir /var/lib/mongodb /var/lib/mysql
sudo mount /var/lib/mongodb
sudo mount /var/lib/mysql
The only thing left to do is installing MongoDB and mysql:
sudo apt install mongodb-server mysql-server
Problem with mysql
I had a problem starting mysql after the installation. I had to remove everything in /var/lib/mysql and initialize the database again:
rm -rf /var/lib/mysql/*
mysqld --initialize
That’s it. One day I’ll write something else about lvm, on how to extend the Volume Groups and the Logical Volumes, snapshots and some more interestings operations with LVM.