
I wrote a post about using LXC Containers in Ubuntu 20.04. I explained there how we could install LXC and how to install Docker and how to run KVM virtual hosts. It simply works. In order to deploy Docker and Virtual Machines we had to build really unsecure containers, thus I wouldn’t use that solution in production environments. However, LXC provides me a way to test how could things be done in infrastructure just using my laptop.
Please, be aware that THIS IS NOT A PRODUCTION SOLUTION. IT IS REALLY UNSECURE. IT IS ONLY INTENDED TO SIMULATE INFRASTRUCUTRE.
Today I’ll be writing on how to deploy Kubernetes in several hosts using LXC. If I deployed several Virtual Machines I would quickly run out of memory in my laptop, however, I can test a Kubernetes installation using LXC without memory problems. In order to do that, I’ve writen a few Ansible files which helps me to deploy my Kubernetes cluster.
Prepare my server (laptop)
First of all I have to install some packages we’ll need in order to be able to run the ansible scripts I’ve coded and let Ansible do it work.
sudo apt install lxc-dev python3-lxc virtualenv sshpassI’ve also created a new Python Virtual environment where to run ansible:
virtualenv -p python3 .venv/ansible
source .venv/ansible/bin/activate
And let my user do “sudo” without password (this is for simplicity) in my own laptop adding a sudo conf file with this line:
jicg ALL=(ALL:ALL) NOPASSWD: ALLAnd, as Kubernetes doesn’t work with Swap, I’ve disabled Swapping in my computer:
sudo swapoff -aNow we are ready to start deploying our Kubernetes!!!
Create Containers using Ansible.
I will assume that the reader is familiar with ansible. There are many good Ansible introductions around. I’m not going to repeat all that again. I’m more interested in the Steps and configurations needed to Deploy a Kubernetes cluster using LXC. Let me repeat again that this is absolutely not intended for production environments but for infrastructure simulation.
First of all, the parameters needed in LXC are even more unsecure than the ones in my previous entry (see container_config) in the code bellow.
I’ve created a repo in GitHub to support this article it here. You can find there every
First of all, I create an Inventory for localhost. The containers will run in my localhost:
[local]
localhost ansible_connection=local
And I’ll configure Ansible to be able to ssh the containers without problems with security of SSH connections and all of that. This is done using the file ansible.cfg:
[ssh_connection]
ssh_args = -o StrictHostKeyChecking=no -o ControlMaster=auto -o ControlPersist=30m
pipelining = True
I also define the container names in a file named playbooks/vars/containers.yaml. There is the controller (only one) and a few worker nodes:
controller_container:
  - kcontroller
worker_containers:
  - kworker1
  - kworker2
  - kworker3
Here is part of the file to deploy and destroy the Containers. The containers will run Ubuntu 20.04 (Focal Fossa). You can find the complete file here:
# To destroy the containers run:
# ansible-playbook  -i inventory CreateLxcContainers.yaml -e state=absent
#
# To start the containers run:
# ansible-playbook  -i inventory CreateLxcContainers.yaml

- hosts: local
  become: true
  tasks:
  - name: "Create LXC Containers"
    lxc_container:
      name: "{{item}}"
      template: ubuntu
      state: "{{state | default('started')}}"
      template_options: --release focal
      container_config:
        - "linux.kernel_modules=ip_tables,ip6_tables,netlink_diag,nf_nat,overlay"
        - "lxc.apparmor.profile=unconfined"
        - "lxc.cap.drop="
        - "lxc.cgroup.devices.allow=a"
        - "lxc.mount.auto=proc:rw sys:rw"
        - "security.nesting=true"
        - "security.privileged=true"
    with_items:
      - "{{ controller_container }}"
      - "{{ worker_containers }}"
    register: containers_info

  vars_files:
    - vars/containers.yaml
The interesting thing here are the parameters defined in the container configuration. We need all that in order to be able to run Kubernetes inside the containers.
Once the containers are created, we can proceed with the Software installation inside each container.
Installing Dockers In the containers
Once the containers are running (it shouldn’t take too long except for the 1st container), we need to install the software in those containers. I’ve writen a helper script in python in order to create a new inventory with the containers. Please, remember that our first inventory was only the localhost. We need an inventory in order to deploy things in every single container.
The helper script must be run with root privileges because it need to access come of the LXC Container properties. Here is an example of a run in my laptop
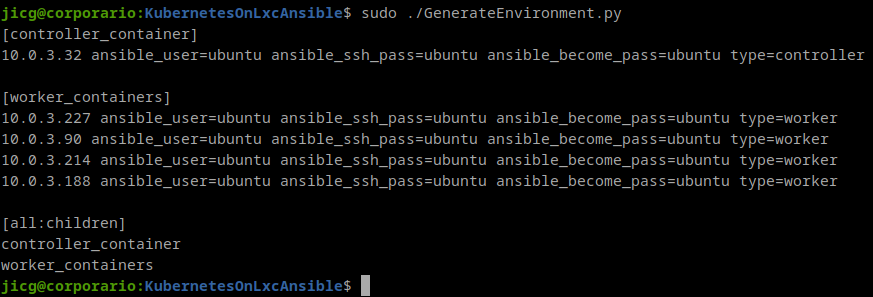
As you can see there is 1 group for the “controller_container” (which is 1 and only one, maybe one day I’ll extend that to HA). And another group for “worker_containers”. That inventory has some variables defined. The user, the password, and the type.
We can write that output to our new inventory file and start installing Software with ansible. Let’s imagine my new inventory is written to file container_inventory. I can Install the Dockers and configure Kubernetes repositories this way:
ansible-playbook -i container_inventory playbooks/InstallDockers.yamlThere are some interesting things here. The playbook is quite commented, so it is easy to read (I hope).
I’d like to comment that inside the containers there are problems with Kubernetes because it has no Character device /dev/kmsg. Some time ago, there was a configuration parameter (That LXC that came with Ubuntu 16.04) but it was removed since (at least) Ubuntu 18.04. That’s why there is a command crating the Character Device in the Playbook
[ -c /dev/kmsg ] || mknod /dev/kmsg c 1 11It is only created if it doesn’t exist. So, the same playbook can be used it we want to install this software in a Virtual machine or wherever.
Install Kubernetes
Basic deployment
This is done with a third Ansible playbook. It starts initializing the Kubernetes Cluster in the Master using this command:
kubeadm init --apiserver-advertise-address="{{ansible_eth0.ipv4.address}}" --pod-network-cidr=172.16.0.0/16 "{{k8s_extra_parameters}}"The advertise address is the first IP of the LXC Container (the one shown in the inventory file). And there is another parameter “k8s_extra_parameters“. This parameter must be set to let Kubernetes ignore some errors it comes throught when it runs inside a container. So, in the variables file, there is a line like this one:
k8s_extra_parameters: "--ignore-preflight-errors=all"If you run this Ansible playbooks in Virtual machines or somewhere out a container, the parameter can be set to an empty string (“”).
Once “kubeadm init” is finished, the configuration is copied to the user’s (ubuntu in this case) directory in .kube/config. So this user in this host will be the master of the kubernetes cluster.
networking services: Flannel and Calico:
Kubernetes will need some networking model to run. In this case I was using Flannel, since it is easy to configure and install. The only thing I had to do is writing this line:
kubectl apply -f https://raw.githubusercontent.com/coreos/flannel/master/Documentation/kube-flannel.ymlCaveat: Flannel wasn’t really performant. So, I decided to change it to Calico.
Installing Calico and make it run is a bit more complex. First thing is applying the Calico manifesto:
kubectl apply -f https://docs.projectcalico.org/manifests/calico.yamlThe second step (which should be done after all the nodes are installed, see bellow) is reconfiguring the kubelet service in every node adding to the file /etc/systemd/system/kubelet.service.d/10-kubeadm.conf after the line [Service] as extra arguments the IP of the controller node:
[Service]
KUBELET_EXTRA_ARGS=--node-ip={{controller_ip}}
....
Once the file is changed, we’ll need to restart the kubelet service:
systemctl daemon-reload
systemctl restart kubelet
And finally, the third and last step (also should be done after every node is installed) to have calico installation working, we need to remount the /sys to be mounted as shared or the calico dockers won’t run:
/usr/bin/mount -o remount,rw,nosuid,nodev,noexec,relatime /sys
/usr/bin/mount --make-shared /sys
This 2 steps to reconfigure Kubernetes and /sys filesystem are done with the fourth ansible script. This won’t harm your installation if you use Flannel instead of Calico.
Joining nodes to the Kubernetes cluster:
The next step is joining the Worker nodes to our kubernets cluster. The way I did this is writing a script to every worker node with the result of the command:
kubeadm token create --print-join-commandSo, I can run that command in every worker node and it can join the kubernetes cluster.
Finally, I’ve deployed an ingress controller to be able to access the HTTP(s) servives that I can deploy in my cluster:
kubectl apply -f https://raw.githubusercontent.com/kubernetes/ingress-nginx/master/deploy/static/provider/baremetal/deploy.yamlThat’s it. Now Kubernetes works
Before anything, I must say that there’s a quick way to reach here: Running one script in the server (my laptop) named InstallKubernetes.sh. This command will run everything to install kubernetes (well I don’t mean it will install ansible nor set the swap off), but once the repository is cloned and you’ve got ansible configured and all of that.
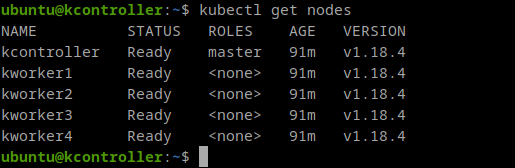
Anyway, now I can login in the controller and I can start running Kubernetes commands, for example, I can show my nodes:
I can see my Ingress service running and (in this case) listening for HTTP on port 31710 and for HTTPS on port 30667:

And as an example of a deployment, as I’m recently using quite often Swagger editor, I can deploy a swagger editor using this file:
apiVersion: apps/v1
kind: Deployment
metadata:
  name: swagger-deployment
spec:
  replicas: 1
  selector:
    matchLabels:
      app: swagger-deployment
  template:
    metadata:
      labels:
        app: swagger-deployment
    spec:
      containers:
      - name: swagger-editor
        image: swaggerapi/swagger-editor
        ports:
          - containerPort: 8080

---
apiVersion: v1
kind: Service
metadata:
  name: swagger-service
spec:
  ports:
  - port: 80
    protocol: TCP
    targetPort: 8080
  selector:
    app: swagger-deployment
  type: ClusterIP

---
apiVersion: networking.k8s.io/v1beta1
kind: Ingress
metadata:
  name: swagger-editor-ingress
spec:
  rules:
  - host: swagger-editor.xip.io
    http:
      paths:
      - backend:
          serviceName: swagger-service
          servicePort: 80
I save that file as swagger-editor.yaml and I apply the changes to kubernetes:
kubectl apply -f swagger-editor.yamlNow, I can edit /etc/hosts in my server and add a new line for the name “swagger-editor.xip.io” using the same IP address that in controller (add a line like the second one):
10.0.3.225 kcontroller
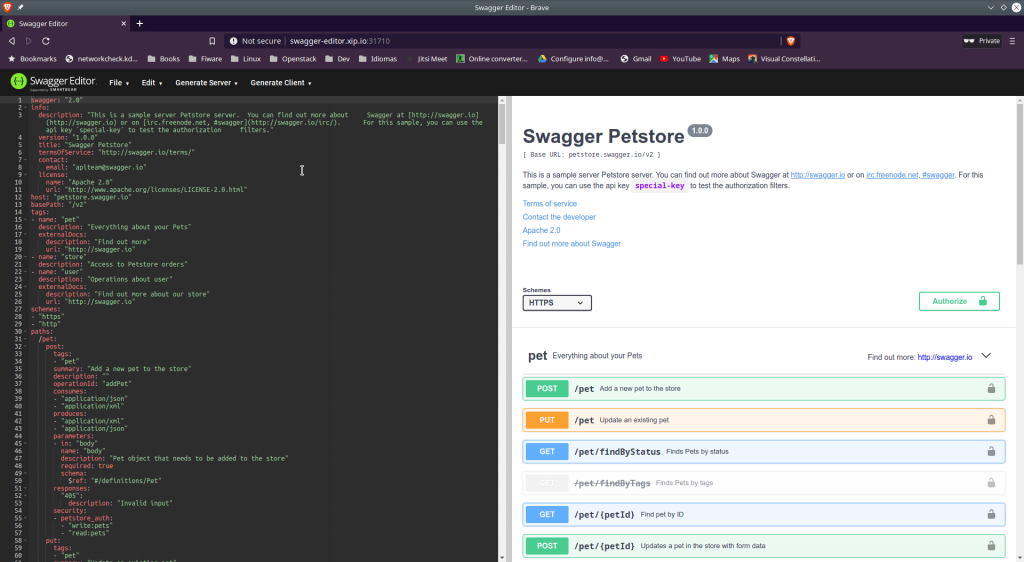
10.0.3.225 swagger-editor.xip.ioI’ll be able to access this new service like this:
The few Last Considerations
Maybe you could be interested in starting/stopping your Kubernetes cluster. This might not properly work because the /dev/kmsg character device is created once in the installation and won’t be created when a container restart. So, there might be problems. In order to solve these problems, I’ve added another Ansible playbook to create a service intended to run before the Kubelet service which creates /dev/kmsg on every startup.
ansible-playbook -i container_inventory playbooks/SetServiceMKNOD.yamlThis playbook will copy a service file (remember this is intended to work in Ubuntu 20.04) to /lib/systemd/system/kmsg-create.service and a very small script to /sbin/kmsg-mknod in every clusters node. After that, it will enable the new service kmsg-create and start it.
After the service is installed, you can safely stop and start the cluster. If you want to stop the cluster run the command:
ansible-playbook -i inventory playbooks/CreateLxcContainers.yaml -e state=stoppedIf you want to start the cluster again, run the command again:
ansible-playbook -i inventory playbooks/CreateLxcContainers.yaml -e state=startedA last word… 6 months later
6 months later I’ve posted this, I’ve been working with Kubernetes and testing, etc. and I’m surprised on how well it runs under LXC compared to some Virtual Servers. 4 worker nodes and one controller running a MySQL, a WordPress and a Mediawiki only takes 1.2Gb of RAM. Much less than only starting 3 Virtual Servers (1 controller and 2 workers). And everything runs rather smoothly.
It is a good tool to practice and learn. I’m sure about it.