
In GlusterFS web page, they describe their product simply like this: “Gluster is a free and open source software scalable network filesystem”. It is interesting since it is designed to scale by providing new resources to the Gluster Cluster.
There is a nice description about what is GlusterFS in their own web page. There, you can read:
- Gluster is an easy way to provision your own storage backend NAS using almost any hardware you choose.
- It’s not just a toy. Gluster is enterprise-ready, and commercial support is available if you need it. It is used in some of the most taxing environments like media serving, natural resource exploration, medical imaging, and even as a filesystem for Big Data.
However, they also warn, among other things that “Gluster does not support so called ‘structured data’, meaning live, SQL databases. Of course, using Gluster to backup and restore the database would be fine”. Using Gluster to store data in your database might lead to delays and sharing a volume with different database servers might lead to corruption.
GlusterFS in the Servers
Following with my classical Ubuntu 20.04 installations, I’ll describe how to install GlusterFS in 2 or more “server” nodes (it doesn’t work only with one node). Let’s imagine we have 3 nodes to install glusterfs-server and the name of these server nodes are gluster1, gluster2 and gluster3. So, in the 3 nodes we should run:
sudo apt install software-properties-common
sudo apt-add-repository  ppa:gluster/glusterfs-7
sudo apt update
sudo apt install glusterfs-server

# Enable and start the glusterd service:
sudo systemctl enable glusterd
sudo systemctl start glusterd
Great, after running those 4 commands we have GlusterFS installed in 3 servers. We need to “connect” them to start working together. So, in only one node (let’s say gluster1 and assuming that every node can access by name to every other node) we can simply run the commands:
sudo gluster peer probe gluster2
sudo gluster peer probe gluster3
We can test that the peers are connected with command:
gluster peer status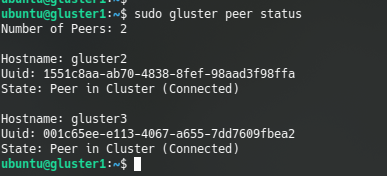
Once the nodes are connected, we’ll be able to create a new Volume to be shared using GlusterFS. For testing purposes we are going to create the Volumes in the root partition which is not recommended. The recommendation is using another different partition to create the volumes, so, sorry for the “trick”. Anyway, for learning and testing could be enough.
First, we need to create the directory containing the volume in the 3 gluster nodes (if we want 3 replicas, we could do it with only 2 replicas and the directory would only be needed in 2 nodes). So, run this command in the 3 nodes:
mkdir /storageAfter the directory exists in the 3 nodes, we can create the gluster volume with “gluster volume create” (force parameter is there to force using the root partition) and we can start the synchronization in the nodes using “gluster volume start”. In this example the name of the volume is “mongodb”:
sudo gluster volume create mongodb replica 3 transport tcp gluster1:/storage/mongodb gluster2:/storage/mongodb gluster3:/storage/mongodb force
sudo gluster volume start mongodb
In order to know the list of volumes or their status, we can check with the commands:
sudo gluster volume list
sudo gluster volume status [volume_name]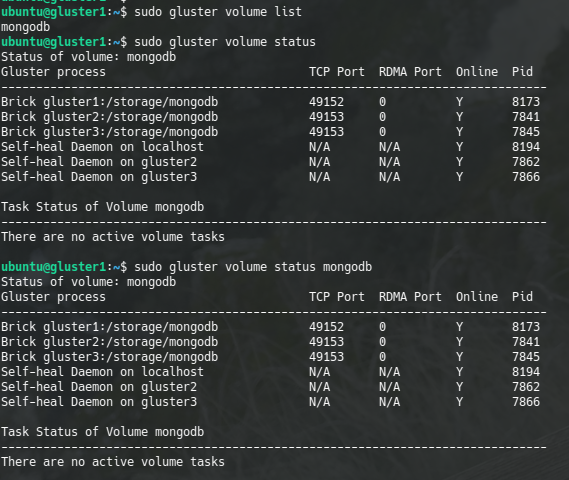
Caveat: I’ll follow the approach for the demo to install a MongoDB using docker having the data in GlusterFS.
Two other interesting commands are meant to stop the volume and to delete the volume. The volume won’t be deleted if is started, so we need to stop it before deleting it:
sudo gluster volume stop xxxx
sudo gluster volume delete xxxx
GlusterFS in the Client
We can mount the “shared” GlusterFS directories in the clients where we have the Gluster client installed. In order to install the Gluster Client:
sudo apt install software-properties-common
sudo apt-add-repository  ppa:gluster/glusterfs-7
sudo apt update
sudo apt install glusterfs-client
Great! We have our client now running. We are going to install a MongoDB using Docker with the data in our Gluster cluster. First, we can create a mount point directory in our Gluster client and mount the Volume:
sudo mkdir /mongodb
sudo mount -t glusterfs gluster1:/mongodb /mongodb
And finally, we only need to run the Mongodb docker:
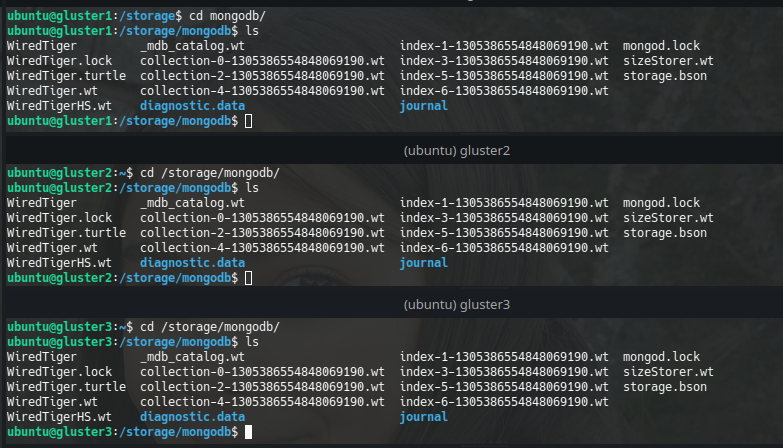
sudo docker run -v /mongodb:/data/db -p 27017:27017 --name mongodb -d mongoThe docker is run (I hope you have Docker installed) and the files are synchronized in the 3 Gluster nodes according to the way we created the Volume:
Something interesting to do is configuring the volume to be automatically mounted when the Gluster Client starts, so, a line like this one could be added to fstab:
gluster1:/mongodb /mongodb glusterfs defaults,_netdev,noauto,x-systemd.automount 0 0Using LXC to Deploy the GlusterFS Cluster
As I’ve done some other times, I’ve coded a couple of Ansible scripts to deploy the GlusterFS cluster using LXC. These scripts can be found in my Github.
In order to get “Ansible” + LXC working in your laptop, you can follow the instructions I gave in my article about deploying Kubernetes on LXC. Under the title: “Prepare my server (laptop)”.