
Recently I wrote a post about deploying Openstack using kolla-ansible. I finished the article explaining that it was working based on the results of Openstack’s dashboard. Yes, I can say that it is working. However, there is not much we can do with an empty installation of Openstack. So, it is working… What should I do as Openstack admin to make it (a bit) useful?
- Install Openstack CLI (Command Line Interface)
So, the admin can type commands to openstack in the CLI Interface. Everything explained in this article can be done with the Web Console but I think it is more productive to use the Command Line. - Add images to Glance
When a Virtual Machine is created (new Instance), the disk of the Instance is built from a previously existent disk image. Something to act as the base for the instance. We need one or more images to build VMs - Add flavors
When a new Instance is created, we need to specify its size in terms of Disk, Memory and Virtual CPUs. This is done using Flavors. By default there is no flavor defined:

- Create Networks
A new instance is not useful if it can’t connect to the internet or we can’t login in the VM. We need to define virtual networks so we can work with our VMs. - Create/Manage users
So different users (at least a non-admin user) should work with the Openstack installation.
On the other hand, what shoud I do as an Openstack user to start using virtual hosts in my new Openstack Installation?
- Create a Keypair
That’s the way to access the Virtual Servers when they are running - Define security group
So I can set up my own “firewall” and open the ports I need to install and run the software I want in my VM. - Create a Virtual Machine
To deploy a new Instance I need to define some things: The image to use, the Flavor of the VM, the network the VM is connected to, the Security groups applied to the VM and the keypair to access the VM.
The user part is out of the scope of this article, however, I’ll show how these parts are done using the CLI.
Install locally the Openstack CLI
In order to have (almost) full control of Openstack, I’d recommend to install the Openstack CLI. There are many ways to install it, however, in this case we’ll do it using a python virtualenv.
virtualenv -p python3 .venv/openstack
source .venv/openstack/bin/activate
pip install python-openstackclient
We’ll also have to define a few environment variables. Taking advantage of this, we can activate the virtualenv when loading these variables. In order to do this, I’ve created a file named keystoneIdmLocal (the name is not important at all) whith this content:
unset OS_TENANT_ID
unset OS_TENANT_NAME

export OS_REGION_NAME="RegionDemo"
export OS_USERNAME='admin'
export OS_PASSWORD=DrXMLxtrIDl2MIwZq6hZJTU0wUvyZ2KvWSEwgJy9
export OS_AUTH_URL=http://controller:5000
export OS_PROJECT_NAME=admin

export OS_PROJECT_DOMAIN_ID=default
export OS_USER_DOMAIN_ID=default
export OS_IDENTITY_API_VERSION=3

export PS1='[\u@\h \W(keystone_admin)]\$ '
source ~/.venv/openstack/bin/activate
So, before using the Openstack commands I simply load these environment using:
source keystoneIdmLocalBasic Networking
At the beginning, after the installation there are no networks defined. We’ll need to create at least 2 networks: An internal network allowing communication between all the Virtual Machines and an external network connected to a router (virtual) to connect the Virtual Machines to the internet.
Internal Network
This network will provide internal communication between virtual machines, access to DHCP internal server and metadata server. It is important to have a network ready. This network will be shared, so all users will be able to use it. You can forget this step and expect every user to create its own network.
Creating a Network means creating the network and at least a Subnet where we will configure the most relevants parameters for the Network:
openstack network create  --share internal

openstack subnet create --network internal \
--allocation-pool start=10.202.254.3,end=10.202.254.254 \
--dns-nameserver 8.8.8.8 --gateway 10.202.254.1 \
--subnet-range 10.202.254.0/24 sub-int-net
The parameter –share will make this internal network available for every openstack user. All the VMs will be able to use this network.
External Network
The external network will provide Internet access to the Virtual Machines. This is a common way to access the VMs from the Internet or from somewhere outside the Openstack installation. In order to create an external network we can type something like this:
openstack network create --external \
--provider-network-type flat \
--provider-physical-network physnet1 ext-net

openstack subnet create --network ext-net \
--allocation-pool start=172.23.16.16,end=172.23.16.254 \
--dns-nameserver 8.8.8.8 --gateway 172.23.16.1 \
--subnet-range 172.23.16.0/24 sub-ext-net
This will create a new external network named ext-net. It will provide IPs from 172.23.16.16 to 172.23.16.254 and it will use 8.8.8.8 as DNS server, 172.23.16.1 as gateway.
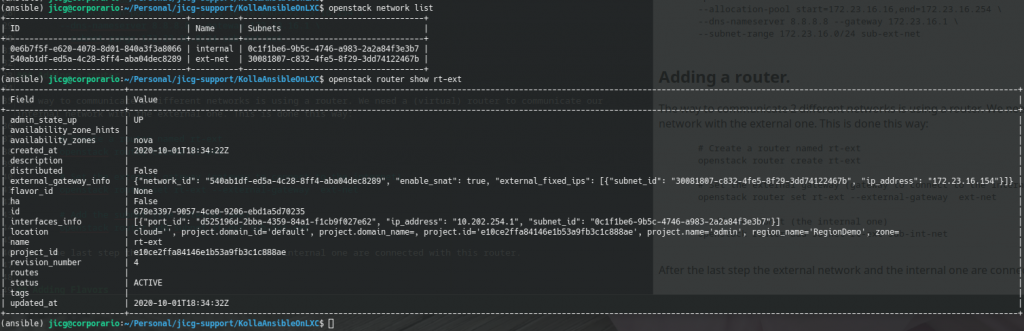
Adding a router
Once we have an internal and an external network, we’ll need to connect them so incoming/outgoing data in the external network can flow from and to the internal network.
Basically, the way to communicate 2 different networks is using a router and we need a router (a virtual one) to communicate our internal network with the external one. This is done this way:
# Create a router named rt-ext
openstack router create rt-ext

# Set the external gateway (gateway to the Internet)
openstack router set rt-ext --external-gateway  ext-net

# Add the subnet (the internal one)
openstack router add subnet rt-ext sub-int-net
After this last step, the external network an the internal one are connected with this router.
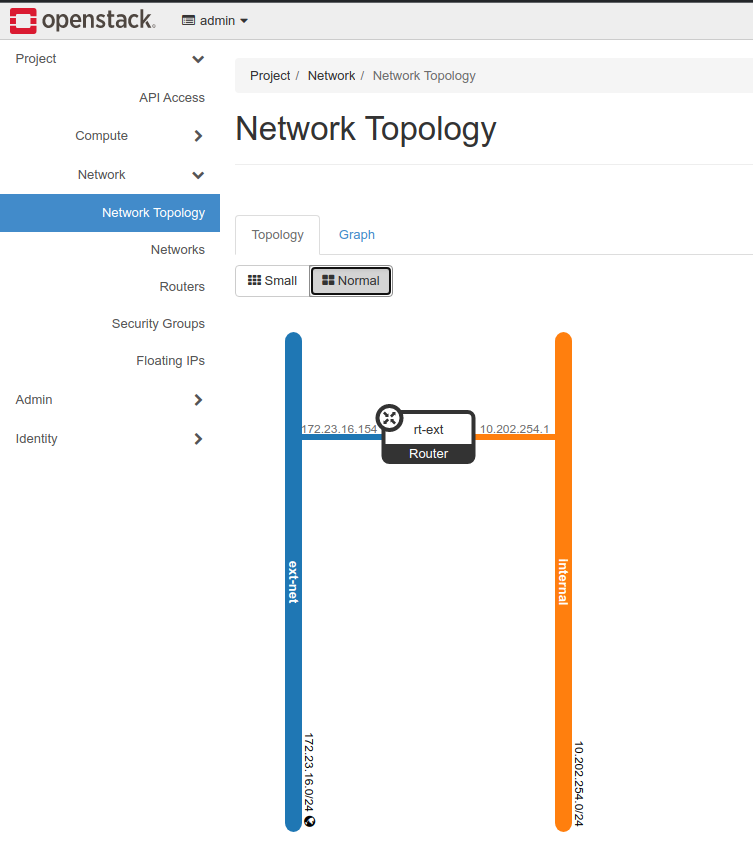
A recap on networking:
We need to create an internal network, an external network and router to link both networks:
However, using the Openstack console we can depict nicely the Network topology we’ve created:
A few commands related to networking
Networking is complex and there are many different things to deal with. Anyway, here are a few commands related to networking which could be useful sometimes (apart from the previously given ones):
# Getting help
openstack help network
openstack help router
openstack help subnet

# Show the Networking Agents. Useful to understand the state
# of the different networking components.
openstack network agent list

# Get a list of the networks
openstack network list

# Get the details of a network
openstack network show <network_id_or_name>

# Delete a network
openstack network delete <network_id_or_name>

# Get a list of subnets
openstack subnet list

# Get a list of subnets belonging to a network
openstack subnet list --network <network_id_or_name>

# Show the details of a subnet
openstack subnet show <subnet_id_or_name>

# Delete a subnetwork
openstack subnet delete <subnet_id_or_name>

# List the routers
openstack router list

# Get the details of a router
openstack router show <router_id_or_name>

# Remove the connection of a subnet with a router
openstack router remove subnet <router> <subnet>

# Remove on router's gateway
openstack router unset --external-gateway <router>
Of course in this case, there are tons more of options to deal with. However, this can give you an overview of the basic commands.
Adding images to Glance
A new Virtual Machine is usually built from a disk image stored in Glance. We need disk images to create virtual machines. The most easy way to get these images is downloading them from the Internet.
There is a really small image very useful for testing which can be downloaded from Internet. The next example shows the 2 steps needed to upload a new image to Glance: downloading the Image and uploading it to glance:
wget http://download.cirros-cloud.net/0.3.4/cirros-0.3.4-x86_64-disk.img

openstack image create "cirros" \
--file cirros-0.3.4-x86_64-disk.img \
--disk-format qcow2 --container-format bare \
--public
There are many more images available to be downloaded. A good starting point is: https://docs.openstack.org/image-guide/obtain-images.html
A few commands related to Glance:
# Getting help
openstack help image
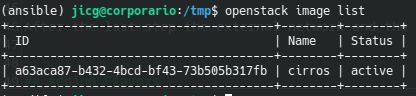
# List images:
openstack image list
# Show details from an image
openstack image show <id_or_name>
# Delete an image
openstack image delete <id_or_name>
# Save a local copy of an image
openstack image save --file local_copy.img <id_or_name>Creating Flavors
The “Flavor” is a set of definitions regarding the number of CPUs, the virtual disk size and the memory which can be used by a virtual machine. By default there are no flavors defined in Openstack but we’ll need a flavor to create a new Virtual Machine.
Let’s create a couple of public flavors: A small one with 1Mb of RAM, 1 virtual CPU and 10Gb for the disk size (with name small) and a medium one with 2Gb of RAM, 2 Virtual CPUS and 20Gb for the disk size (with name medium):
openstack flavor create --ram $((1*1024)) \
--disk 10 --vcpus 1 --public small

openstack flavor create --ram $((2*1024)) \
--disk 20 --vcpus 2 --public medium
A few flavor commands:
# Getting help
openstack help flavor

# Listing of flavors
openstack flavor list

# Show details of a flavor
openstack flavor show <flavor_name_or_id>

# Delete a flavor
openstack flavor delete <flavor_name_or_id>
Adding a new user
We could always work as admin, but this is not usually a best practice. We would like to create new users and new projects to work with Openstack.
The basic rules to keep in mind are:
- Resources usually belong to projects
- An user has one or more roles in one or more projects.
So, we’ll need to create at least a project, at least one user and assign at least one role to the user in the project.
By default there are some roles defined after Opentstack installation:

So, we create a new project, a new user and assign a role to the user in the project this way:
# 1st we create a new project called jicg_project
openstack project create --domain default jicg_project
# 2nd we create a new user called jicg. In this case
# setting a password. This can be changed in the console.
openstack user create --password mysecretpassword jicg
# 3rd we assign the role "member" to the user jicg
# in the project jicg_project
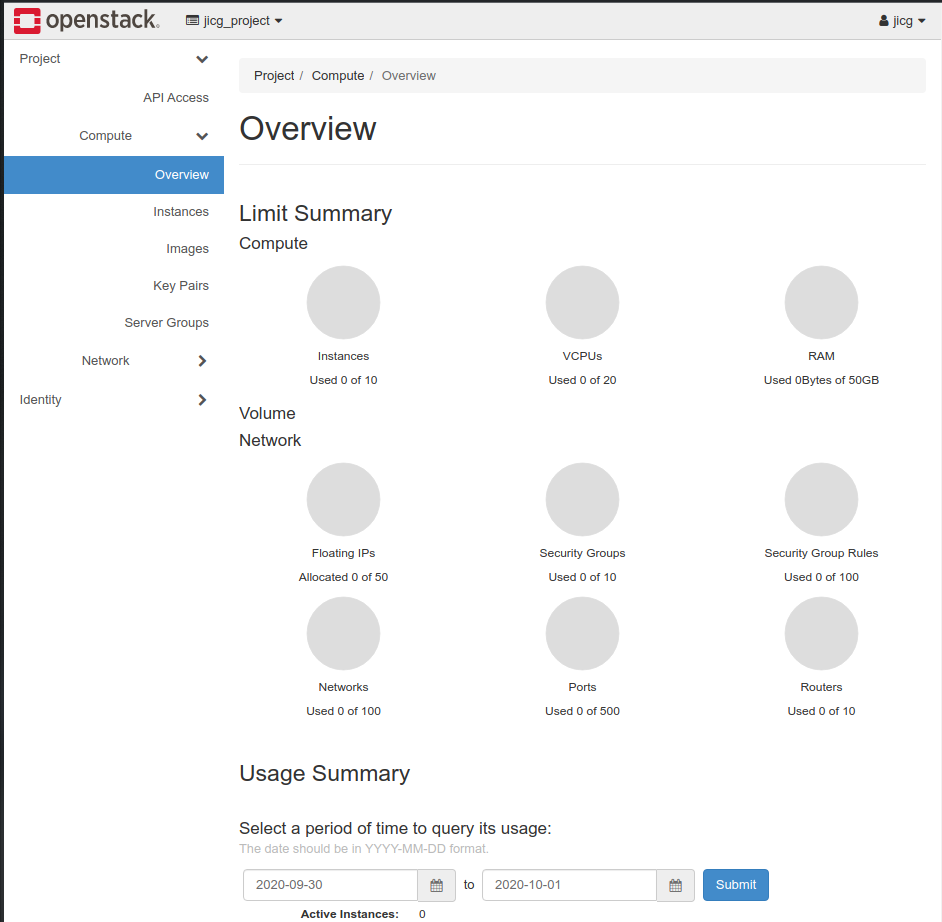
openstack role add --user jicg --project jicg_project memberNow the user should be able to log in the console:
Nova: Our first virtual machine
Everybody wants to know how to deploy a VM and how to use it. Let’s say that there are 4 mandatory steps after the Administrator has created the flavors, the networks and uploaded some images to work with (an user can usually create their own Images, networks, etc.):
- Creating one (or more than one) Security Group with some Security Rules.
- Creating a Keypair.
- Allocating a Floating IP to the project
- Launching our 1st Virtual machine.
The first 3 steps are only mandatory for the 1st VM. The following ones could be created
Creating a Security Group and security rules.
Openstack acts as a closed firewall for the VMs it manages and the user is resposible to create some rules for that firewall thoroughly. For the shake of simplicity I’m going to leave out the meaning of “thoroughly” here.
So, the 1st step is creating a Security Group:
# Create a SG with the name demosecgroup
openstack create security group demosecgroup
Add rules to the security group:
# Open tcp port 22 for everybody (network 0.0.0.0/0)
# for incoming traffic.
openstack security group rule create \
--remote-ip 0.0.0.0/0 \
--protocol tcp \
--dst-port 22 \
--ingress \
demosecgroup

# The same can be done for port HTTP (80) and HTTPS (443).
Creating a new Keypair
In order to access the Virtual Machines, we’ll use ssh protocol. Most of the images we can get from the Internet are prepared to allow only ssh connections using a Private-public keypair.
We can generate one easily:
# This makes openstack create a keypair. The output of the
# command is the private key. The public key is stored in
# Opentasck so it can be injected in the VMs.
openstack  keypair create demokeypair > demokeypair.pem
As you can see, the content of the file is a private keypair which can be used to login in the VMs. There a few things to consider:
- The new file has too many permissions. We have to close a bit more the permissions of the file so we can use it with the command “chmod 400 demokeypair.pem“.
- If we loose this file, we probably won’t be able to connect to our VMs. There is no way to recover this file.
Allocate a new Public IP.
We have to allocate a new public IP to the project in order to associate it to the VM (when we have a VM). The allocation of a new IP can be done like this:
# ext-net is the name of the external network we created
# before.
openstack floating ip create ext-net
We can find the available networks like this

And as you can see, we have a new Floating IP (public IP) which can be shown with command “openstack floating ip list“:

Create our 1st Virtual Host
Finally, this long expected thing!!!. In this step everything done until now makes sense. In order to create a new VM we need to merge all the things we’ve done before in a single command: The image, the shared (internal) network, the security group, the floating IP, the keypair, … Everything!
# Create a new Server which name is demovm
# Using flavor small, from cirros image, using sec. group
# demosecgroup the network internal and the keypair.
# Everything previously created
openstack server create \
--flavor small \
--image cirros \
--security-group demosecgroup \
--network internal \
--key-name demokeypair \
demovm
After a few minutes we’ll have our VM created:
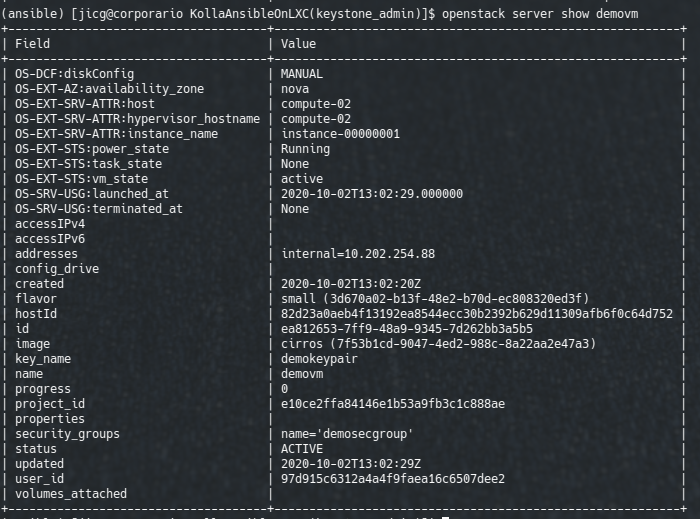
The last step is setting the floating IP to this server, given a floating IP:

openstack floating ip list
....
# My floating IP ID=b43f4537-d28b-4444-a2db-3467500c1900

openstack server add floating ip demovm \
b43f4537-d28b-4444-a2db-3467500c1900
Once done this, I can ssh to my new VM!!!

Caveat: In modern Linuxes the key exchange algorithm will be disabled and thus we’ll be able to login our Cirros VM unless we activate it. We can activate it for this VM editing the file ~/.ssh/config and adding:
Host 172.23.16.48
    KexAlgorithms +diffie-hellman-group1-sha1
Two more comands:
# Show the console of the VM (the boot output, basically)
openstack console log show <server_name_or_id>

# Get an URL to connect the VM In the browser.
openstack console url show <server_name_or_id>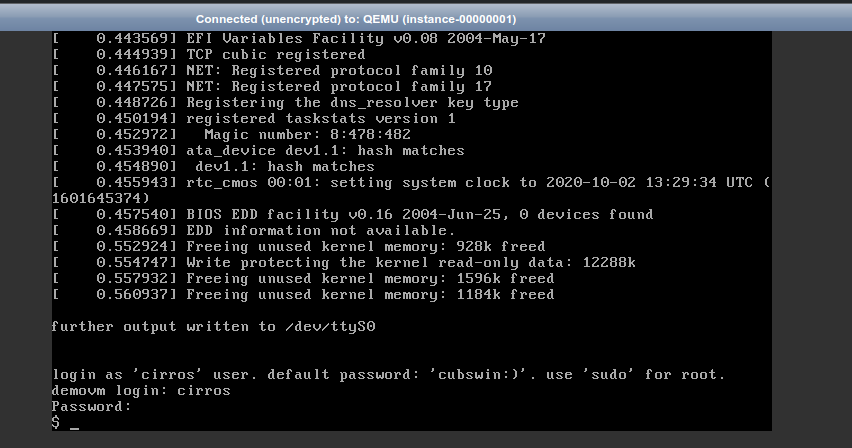
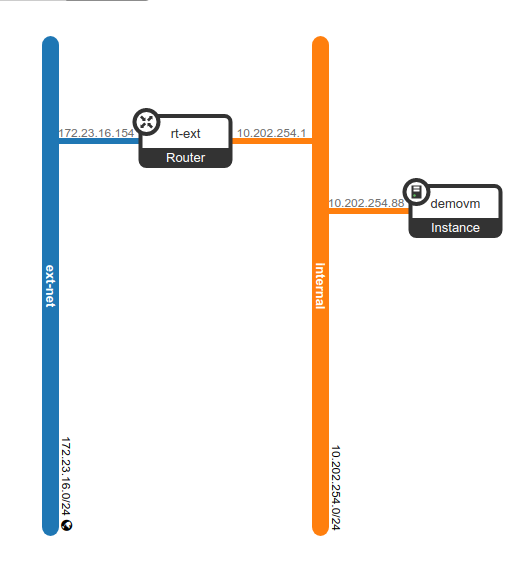
Finally, I’d like to show the new network topology with the VM connected to the internal network:
A few commands for Servers
At least there are a few commands we should know in order to work with our Virtual Machines (servers) quickly:
# Getting help
openstack help server

# Shutdown a server
openstack server stop <server_id_or_name>

# Restart a server
openstack server start <server_id_or_name>

# Pause / unapuse a server
openstack server pause <server_id_or_name>
openstack server unpause <server_id_or_name>

# Suspend / resume a server
openstack server suspend <server_id_or_name>
openstack server resume <server_id_or_name>

# Delete a server (Forever! Destroy everything)
openstack server delete <server_id_or_name>