In GlusterFS web page, they describe their product simply like this: “Gluster is a free and open source software scalable network filesystem”. It is interesting since it is designed to scale by providing new resources to the Gluster Cluster.
There is a nice description about what is GlusterFS in their own web page. There, you can read:
Gluster is an easy way to provision your own storage backend NAS using almost any hardware you choose.
It’s not just a toy. Gluster is enterprise-ready, and commercial support is available if you need it. It is used in some of the most taxing environments like media serving, natural resource exploration, medical imaging, and even as a filesystem for Big Data.
However, they also warn, among other things that “Gluster does not support so called ‘structured data’, meaning live, SQL databases. Of course, using Gluster to backup and restore the database would be fine”. Using Gluster to store data in your database might lead to delays and sharing a volume with different database servers might lead to corruption.
GlusterFS in the Servers
Following with my classical Ubuntu 20.04 installations, I’ll describe how to install GlusterFS in 2 or more “server” nodes (it doesn’t work only with one node). Let’s imagine we have 3 nodes to install glusterfs-server and the name of these server nodes are gluster1, gluster2 and gluster3. So, in the 3 nodes we should run:
Great, after running those 4 commands we have GlusterFS installed in 3 servers. We need to “connect” them to start working together. So, in only one node (let’s say gluster1 and assuming that every node can access by name to every other node) we can simply run the commands:
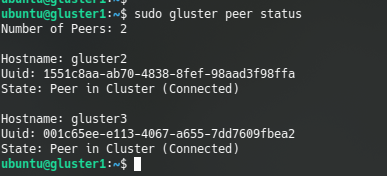
We can test that the peers are connected with command:
gluster peer status
gluster peer status output
Once the nodes are connected, we’ll be able to create a new Volume to be shared using GlusterFS. For testing purposes we are going to create the Volumes in the root partition which is not recommended. The recommendation is using another different partition to create the volumes, so, sorry for the “trick”. Anyway, for learning and testing could be enough.
First, we need to create the directory containing the volume in the 3 gluster nodes (if we want 3 replicas, we could do it with only 2 replicas and the directory would only be needed in 2 nodes). So, run this command in the 3 nodes:
mkdir /storage
After the directory exists in the 3 nodes, we can create the gluster volume with “gluster volume create” (force parameter is there to force using the root partition) and we can start the synchronization in the nodes using “gluster volume start”. In this example the name of the volume is “mongodb”:
sudo gluster volume create mongodb replica 3 transport tcp gluster1:/storage/mongodb gluster2:/storage/mongodb gluster3:/storage/mongodb force
sudo gluster volume start mongodb
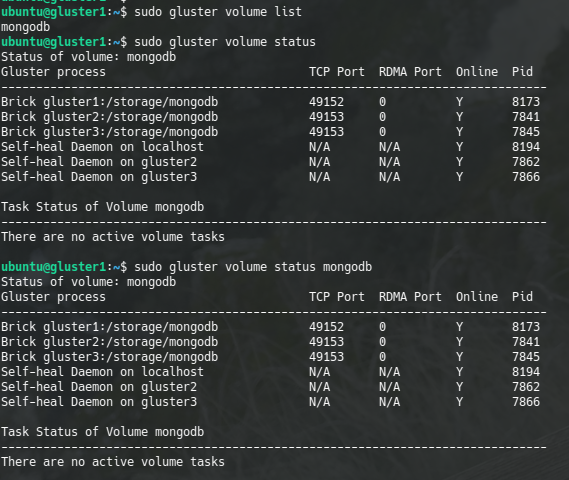
In order to know the list of volumes or their status, we can check with the commands:
sudo gluster volume list
sudo gluster volume status [volume_name]
gluster volume list and gluster volume status
Caveat: I’ll follow the approach for the demo to install a MongoDB using docker having the data in GlusterFS.
Two other interesting commands are meant to stop the volume and to delete the volume. The volume won’t be deleted if is started, so we need to stop it before deleting it:
Great! We have our client now running. We are going to install a MongoDB using Docker with the data in our Gluster cluster. First, we can create a mount point directory in our Gluster client and mount the Volume:
sudo mkdir /mongodb
sudo mount -t glusterfs gluster1:/mongodb /mongodb
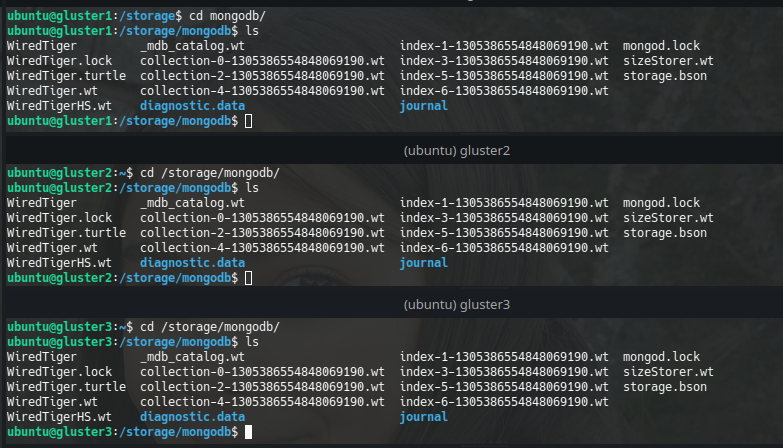
And finally, we only need to run the Mongodb docker:
The docker is run (I hope you have Docker installed) and the files are synchronized in the 3 Gluster nodes according to the way we created the Volume:
Something interesting to do is configuring the volume to be automatically mounted when the Gluster Client starts, so, a line like this one could be added to fstab:
As I’ve done some other times, I’ve coded a couple of Ansible scripts to deploy the GlusterFS cluster using LXC. These scripts can be found in my Github.
In order to get “Ansible” + LXC working in your laptop, you can follow the instructions I gave in my article about deploying Kubernetes on LXC. Under the title: “Prepare my server (laptop)”.
I’ve always wanted to remember all the parameters that a command is actually using, however, my memory is not as good as it used to be. So, I need some cheatsheets from time to time.
Maybe you can benefit from this Cheatsheet if you are reading this.
According to https://openssl.org, “OpenSSL is a robust, commercial-grade, and full-featured toolkit for the Transport Layer Security (TLS) and Secure Sockets Layer (SSL) protocols. It is also a general-purpose cryptography library…”. It is licensed as some kind of Apache license. So, yes, basically it is free to use.
Working with Keys
The first thing we can do with OpenSSL is creating a new Private Key. In the example case, we are creating a key named test.private.key 4096 bit long. We can use another lengths (2048, 1024). The “more bits” used in the key generation, the stronger the cypher. 2048 is a good length for security.
# Create a new PRIVATE key
openssl genrsa -out test.private.key 4096
We might also need to create a public key to be distributed. It is quite difficult to find out a private key from a public key (it would take even years of computation), however, it is very simple to get the public key from the private key:
# Get the PUBLIC key from the private key.
openssl rsa -pubout -in  test.private.key  -out test.public.key
Both, private and public keys should have the same modulus. (You take a look to this post if you want to know why):
# Public key and Private Key need to have same modulus value to be a Key Pair
openssl rsa -noout -modulus -in test.private.key
openssl rsa -noout -modulus -pubin -in test.public.key
If the modulus are different, then the keys doesn’t match one with the other. Thus, what we cipher with the public key can’t be deciphered with the private one. Of course, “public key” means that we can give that key to anyone as something public so anyone can send messages ciphered messages to us. And “private key” means that it is private and none should know the content, we must keep in absolute secret our private keys.
Encrypt and Decrypt files
We won’t be able to encrypt large files using our public key. Let’s say that using a 4096 bit key we can only cipher up to roughly 500 bytes. Obviously it is not enough. And what’s more important, this cipher is really slow. However, we could use this to cipher some data:
# Encrypt with public key
openssl rsautl -encrypt -inkey test.public.key  -pubin -in small_file -out small_encrypted_file.dat

# Decrypt with private key
openssl rsautl --decrypt -inkey test.private.key  -in small_encrypted_file.dat -out new_small_file.txt
# Encrypt with "private key" or sign the file:
openssl rsautl -encrypt -inkey test.private.key  -sign -in small_file -out small_signed_file.dat

# Decrypt with "public key" or verify a signed file:
openssl rsautl -verify -inkey test.public.key -pubin -in small_signed_file.dat -out new_verified_small_file
However, we can encrypt a file as large as we want just by using symmetric cryptography, using a password shared between 2 endpoints. so the message can only be read by those who have the the password to decrypt it:
The sha256 sum will be in the “simply_as_curiosity_file” file in a binary format. We can see it using hd (hex dump) command:
So, if we’ve been able to decrypt the signature file using a public key, it must be true that it has been encrypted using the private key that only is installed in one place of for a single user.
Certificates
To create a new certificate we need a Certificate request first using our private key, we can run a command like the next one:
We can also create a Certificate Request and generate a private key for that certificate in the same command:
# This generates a certifcate request (test.example.com..csr) and a new private key (2.test.private.key)
# Last parameter -nodes means that there will be no password for the private key.
openssl req -newkey rsa:4096 -subj "/C=ES/ST=Salamanca/L=Corporario/O=Test OpenSSL S.L./OU=IT department/CN=test.example.com" \
 -out test.example.com.csr -keyout 2.test.private.key -nodes
Using this certificate request and the public key, we can ask to a certification authority to provide us a singed certificate (previous payments, of course). Or, we can create a self signed certificate which could be useful in companies or in projects where we could locally trust the certificate recently done. In order to create a self signed certificate, we could do:
We can see the information in the certificate with these commands:
# Check Modulus. It must be the same as in private key and public key
openssl x509 -modulus -noout -in test.domain.crt

# Show certificate info.
openssl x509 -noout -text -in test.domain.crt
In order to verify the certificate we can use this command, though it will fail because it is a self-signed certificate and possibly an untrusted one.
openssl verify test.domain.crt
We can verify a certificate installed in a Web Site this way:
openssl s_client --connect jicg.eu:443

# Or even we can extract it:
openssl s_client --connect jicg.eu:443 | sed -n '/----BEGIN CERTIFICATE/, /----END CERTIFICATE/p' 2>/dev/null
Generate Random Numbers
We can also generate random numbers with Openssl this way:
# Example a 30 digit number base64 encoded
openssl rand -base64 30
We can even manage to generate quite secure passwords using a command like the next one.
Recently I wrote a post about deploying Openstack using kolla-ansible. I finished the article explaining that it was working based on the results of Openstack’s dashboard. Yes, I can say that it is working. However, there is not much we can do with an empty installation of Openstack. So, it is working… What should I do as Openstack admin to make it (a bit) useful?
Install Openstack CLI (Command Line Interface) So, the admin can type commands to openstack in the CLI Interface. Everything explained in this article can be done with the Web Console but I think it is more productive to use the Command Line.
Add images to Glance When a Virtual Machine is created (new Instance), the disk of the Instance is built from a previously existent disk image. Something to act as the base for the instance. We need one or more images to build VMs
Add flavors When a new Instance is created, we need to specify its size in terms of Disk, Memory and Virtual CPUs. This is done using Flavors. By default there is no flavor defined:
Listing of flavors is empty.
Create Networks A new instance is not useful if it can’t connect to the internet or we can’t login in the VM. We need to define virtual networks so we can work with our VMs.
Create/Manage users So different users (at least a non-admin user) should work with the Openstack installation.
On the other hand, what shoud I do as an Openstack user to start using virtual hosts in my new Openstack Installation?
Create a Keypair That’s the way to access the Virtual Servers when they are running
Define security group So I can set up my own “firewall” and open the ports I need to install and run the software I want in my VM.
Create a Virtual Machine To deploy a new Instance I need to define some things: The image to use, the Flavor of the VM, the network the VM is connected to, the Security groups applied to the VM and the keypair to access the VM.
The user part is out of the scope of this article, however, I’ll show how these parts are done using the CLI.
Install locally the Openstack CLI
In order to have (almost) full control of Openstack, I’d recommend to install the Openstack CLI. There are many ways to install it, however, in this case we’ll do it using a python virtualenv.
We’ll also have to define a few environment variables. Taking advantage of this, we can activate the virtualenv when loading these variables. In order to do this, I’ve created a file named keystoneIdmLocal (the name is not important at all) whith this content:
So, before using the Openstack commands I simply load these environment using:
source keystoneIdmLocal
Basic Networking
At the beginning, after the installation there are no networks defined. We’ll need to create at least 2 networks: An internal network allowing communication between all the Virtual Machines and an external network connected to a router (virtual) to connect the Virtual Machines to the internet.
Internal Network
This network will provide internal communication between virtual machines, access to DHCP internal server and metadata server. It is important to have a network ready. This network will be shared, so all users will be able to use it. You can forget this step and expect every user to create its own network.
Creating a Network means creating the network and at least a Subnet where we will configure the most relevants parameters for the Network:
The parameter –share will make this internal network available for every openstack user. All the VMs will be able to use this network.
External Network
The external network will provide Internet access to the Virtual Machines. This is a common way to access the VMs from the Internet or from somewhere outside the Openstack installation. In order to create an external network we can type something like this:
This will create a new external network named ext-net. It will provide IPs from 172.23.16.16 to 172.23.16.254 and it will use 8.8.8.8 as DNS server, 172.23.16.1 as gateway.
Adding a router
Once we have an internal and an external network, we’ll need to connect them so incoming/outgoing data in the external network can flow from and to the internal network.
Basically, the way to communicate 2 different networks is using a router and we need a router (a virtual one) to communicate our internal network with the external one. This is done this way:
# Create a router named rt-ext
openstack router create rt-ext

# Set the external gateway (gateway to the Internet)
openstack router set rt-ext --external-gateway  ext-net

# Add the subnet (the internal one)
openstack router add subnet rt-ext sub-int-net
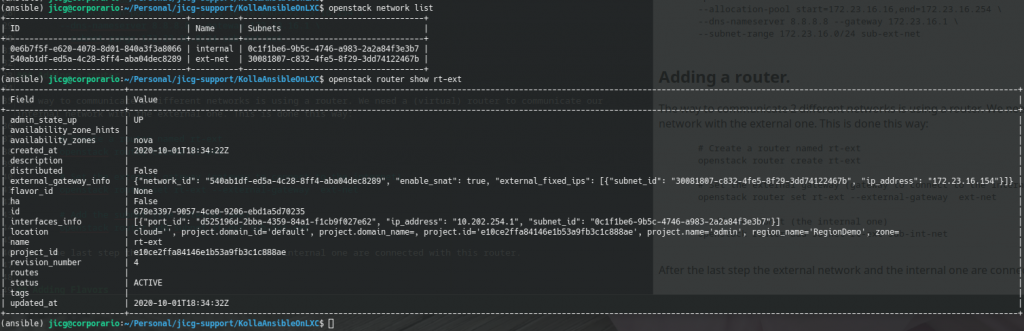
After this last step, the external network an the internal one are connected with this router.
A recap on networking:
We need to create an internal network, an external network and router to link both networks:
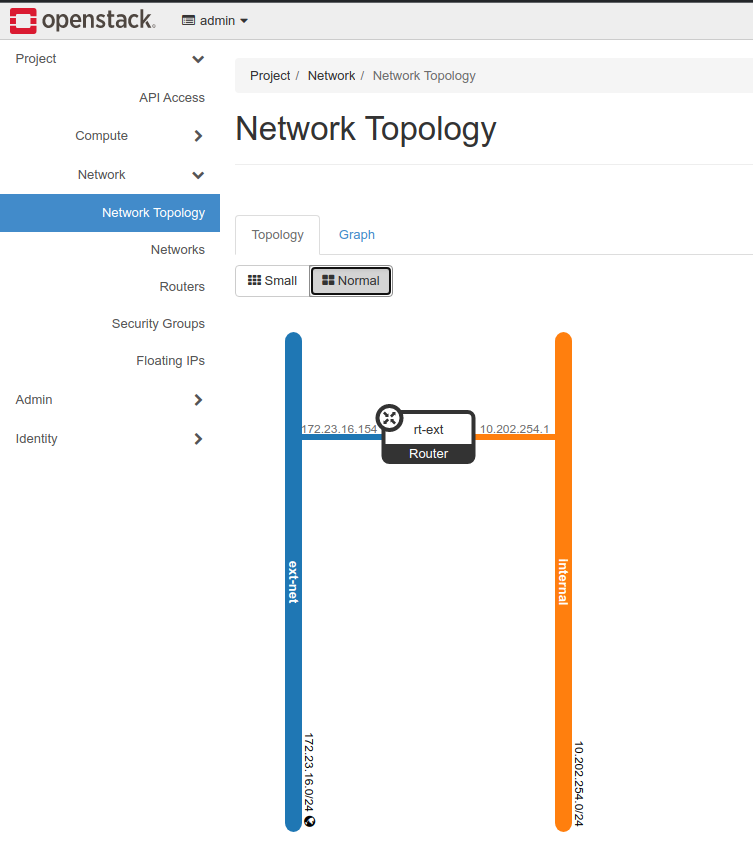
However, using the Openstack console we can depict nicely the Network topology we’ve created:
Network topology after our Openstack commands
A few commands related to networking
Networking is complex and there are many different things to deal with. Anyway, here are a few commands related to networking which could be useful sometimes (apart from the previously given ones):
# Getting help
openstack help network
openstack help router
openstack help subnet

# Show the Networking Agents. Useful to understand the state
# of the different networking components.
openstack network agent list

# Get a list of the networks
openstack network list

# Get the details of a network
openstack network show <network_id_or_name>

# Delete a network
openstack network delete <network_id_or_name>

# Get a list of subnets
openstack subnet list

# Get a list of subnets belonging to a network
openstack subnet list --network <network_id_or_name>

# Show the details of a subnet
openstack subnet show <subnet_id_or_name>

# Delete a subnetwork
openstack subnet delete <subnet_id_or_name>

# List the routers
openstack router list

# Get the details of a router
openstack router show <router_id_or_name>

# Remove the connection of a subnet with a router
openstack router remove subnet <router> <subnet>

# Remove on router's gateway
openstack router unset --external-gateway <router>
Of course in this case, there are tons more of options to deal with. However, this can give you an overview of the basic commands.
Adding images to Glance
A new Virtual Machine is usually built from a disk image stored in Glance. We need disk images to create virtual machines. The most easy way to get these images is downloading them from the Internet.
There is a really small image very useful for testing which can be downloaded from Internet. The next example shows the 2 steps needed to upload a new image to Glance: downloading the Image and uploading it to glance:
# Getting help
openstack help image
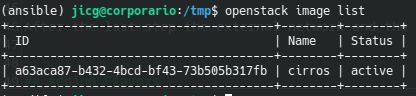
# List images:
openstack image list
# Show details from an image
openstack image show <id_or_name>
# Delete an image
openstack image delete <id_or_name>
# Save a local copy of an image
openstack image save --file local_copy.img <id_or_name>
Creating Flavors
The “Flavor” is a set of definitions regarding the number of CPUs, the virtual disk size and the memory which can be used by a virtual machine. By default there are no flavors defined in Openstack but we’ll need a flavor to create a new Virtual Machine.
Let’s create a couple of public flavors: A small one with 1Mb of RAM, 1 virtual CPU and 10Gb for the disk size (with name small) and a medium one with 2Gb of RAM, 2 Virtual CPUS and 20Gb for the disk size (with name medium):
# Getting help
openstack help flavor

# Listing of flavors
openstack flavor list

# Show details of a flavor
openstack flavor show <flavor_name_or_id>

# Delete a flavor
openstack flavor delete <flavor_name_or_id>
Adding a new user
We could always work as admin, but this is not usually a best practice. We would like to create new users and new projects to work with Openstack.
The basic rules to keep in mind are:
Resources usually belong to projects
An user has one or more roles in one or more projects.
So, we’ll need to create at least a project, at least one user and assign at least one role to the user in the project.
By default there are some roles defined after Opentstack installation:
Default roles after Openstack installation
So, we create a new project, a new user and assign a role to the user in the project this way:
# 1st we create a new project called jicg_project
openstack project create --domain default jicg_project

# 2nd we create a new user called jicg. In this case
# setting a password. This can be changed in the console.
openstack user create --password mysecretpassword jicg

# 3rd we assign the role "member" to the user jicg
# in the project jicg_project
openstack role add --user jicg --project jicg_project member
Now the user should be able to log in the console:
Nova: Our first virtual machine
Everybody wants to know how to deploy a VM and how to use it. Let’s say that there are 4 mandatory steps after the Administrator has created the flavors, the networks and uploaded some images to work with (an user can usually create their own Images, networks, etc.):
Creating one (or more than one) Security Group with some Security Rules.
Creating a Keypair.
Allocating a Floating IP to the project
Launching our 1st Virtual machine.
The first 3 steps are only mandatory for the 1st VM. The following ones could be created
Creating a Security Group and security rules.
Openstack acts as a closed firewall for the VMs it manages and the user is resposible to create some rules for that firewall thoroughly. For the shake of simplicity I’m going to leave out the meaning of “thoroughly” here.
So, the 1st step is creating a Security Group:
# Create a SG with the name demosecgroup
openstack create security group demosecgroup
Add rules to the security group:
# Open tcp port 22 for everybody (network 0.0.0.0/0)
# for incoming traffic.
openstack security group rule create \
--remote-ip 0.0.0.0/0 \
--protocol tcp \
--dst-port 22 \
--ingress \
demosecgroup

# The same can be done for port HTTP (80) and HTTPS (443).
Creating a new Keypair
In order to access the Virtual Machines, we’ll use ssh protocol. Most of the images we can get from the Internet are prepared to allow only ssh connections using a Private-public keypair.
We can generate one easily:
# This makes openstack create a keypair. The output of the
# command is the private key. The public key is stored in
# Opentasck so it can be injected in the VMs.
openstack  keypair create demokeypair > demokeypair.pem
As you can see, the content of the file is a private keypair which can be used to login in the VMs. There a few things to consider:
The new file has too many permissions. We have to close a bit more the permissions of the file so we can use it with the command “chmod 400 demokeypair.pem“.
If we loose this file, we probably won’t be able to connect to our VMs. There is no way to recover this file.
Allocate a new Public IP.
We have to allocate a new public IP to the project in order to associate it to the VM (when we have a VM). The allocation of a new IP can be done like this:
# ext-net is the name of the external network we created
# before.
openstack floating ip create ext-net
We can find the available networks like this
List of available networks.
And as you can see, we have a new Floating IP (public IP) which can be shown with command “openstack floating ip list“:
Create our 1st Virtual Host
Finally, this long expected thing!!!. In this step everything done until now makes sense. In order to create a new VM we need to merge all the things we’ve done before in a single command: The image, the shared (internal) network, the security group, the floating IP, the keypair, … Everything!
# Create a new Server which name is demovm
# Using flavor small, from cirros image, using sec. group
# demosecgroup the network internal and the keypair.
# Everything previously created
openstack server create \
--flavor small \
--image cirros \
--security-group demosecgroup \
--network internal \
--key-name demokeypair \
demovm
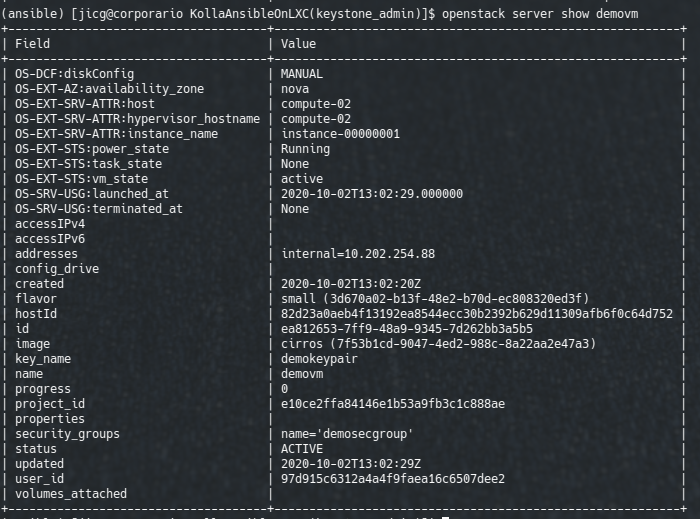
After a few minutes we’ll have our VM created:
Newly created Server
The last step is setting the floating IP to this server, given a floating IP:
My floating IP…
openstack floating ip list
....
# My floating IP ID=b43f4537-d28b-4444-a2db-3467500c1900

openstack server add floating ip demovm \
b43f4537-d28b-4444-a2db-3467500c1900
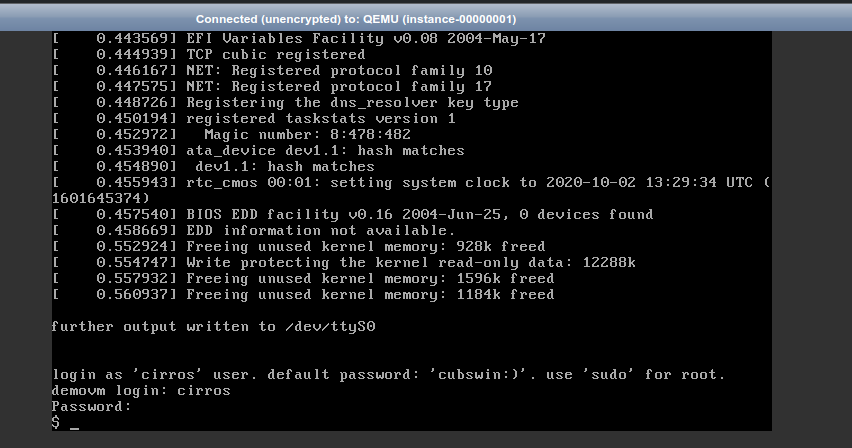
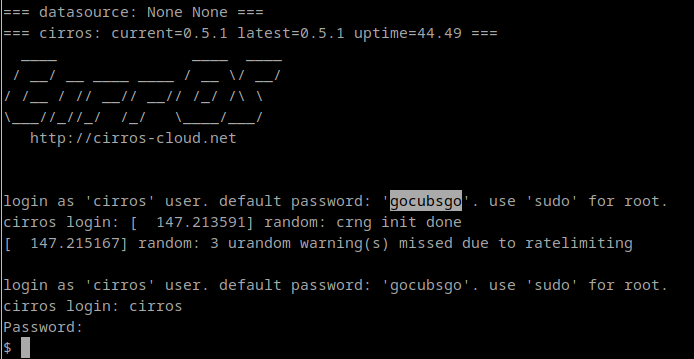
Once done this, I can ssh to my new VM!!!
Caveat: In modern Linuxes the key exchange algorithm will be disabled and thus we’ll be able to login our Cirros VM unless we activate it. We can activate it for this VM editing the file ~/.ssh/config and adding:
# Show the console of the VM (the boot output, basically)
openstack console log show <server_name_or_id>

# Get an URL to connect the VM In the browser.
openstack console url show <server_name_or_id>
Example of Console in the browser
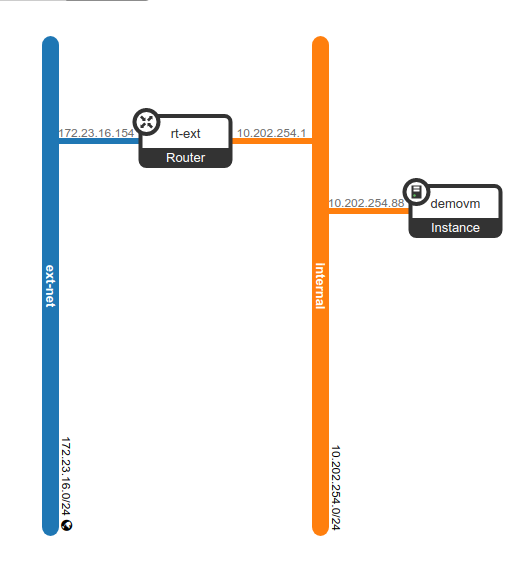
Finally, I’d like to show the new network topology with the VM connected to the internal network:
New network topology with the VM connected
A few commands for Servers
At least there are a few commands we should know in order to work with our Virtual Machines (servers) quickly:
# Getting help
openstack help server

# Shutdown a server
openstack server stop <server_id_or_name>

# Restart a server
openstack server start <server_id_or_name>

# Pause / unapuse a server
openstack server pause <server_id_or_name>
openstack server unpause <server_id_or_name>

# Suspend / resume a server
openstack server suspend <server_id_or_name>
openstack server resume <server_id_or_name>

# Delete a server (Forever! Destroy everything)
openstack server delete <server_id_or_name>
After writing about using LXC and showing its capabilities to run Docker and Virtual Machines, in a Post showing how to start with LXC, and the second one showing how to deploy a Kubernetes cluster in with LXC, I’m going to show today how I’ve deployed an Openstack Cluster using LXC, once more I’ll be using ansible as a helper tool to deploy the containers and install the software I’ll need to deploy in the cluster before deploying Openstack.
As I already said in my previous post, I’ll recomend you to be aware that THIS IS NOT A PRODUCTION SOLUTION. IT IS REALLY UNSECURE. IT IS ONLY INTENDED TO SIMULATE INFRASTRUCUTRE.
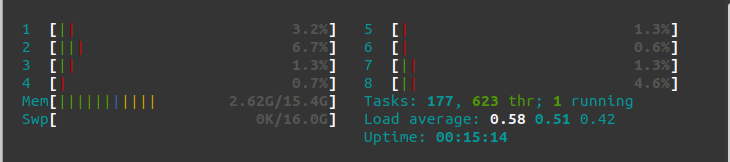
Before doing anything, just starting my Ubuntu 20.04 with my Brave Browser to start writing this POST, my memory consumption is 2.62 Gb.
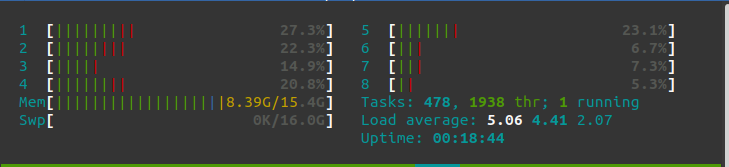
After starting my Openstack cluster with one controller and 3 compute nodes, my memory consumption is 8.4Gb. Yes, it is not cheap in terms of memory, however, it is rather affordable. You can always do with 1 compute node anyway.
As you can imagine, this is going to be a very simple Openstack deployment. Only with a few basic services: Nova (to deploy VMs), Neutron (to manage networks), Glance (for the VM images) and Keystone (for user identification). Maybe in a future I’ll write about deploying more services to this Openstack installation like Cinder to manage volumes or Ceilometer for Telemetry. But in this case it is going to be a very basic deployment.
Installing previous software in my server
Please, keep in mind that “My Server” is nothing but my own laptop. A HP Pavillion with Ubuntu 20.04 installed: Intel i7 with 16Gb RAM and 512Gb Hd.
First of all, I must have ansible installed, however, I already explained that in my POST about Kubernetes on LXC. Anyway, it is only a few lines, so I can write that again:
# To install LXC:
sudo apt install lxc lxc-utils lxc- templates lxc-dev

# To install other packages needed:
sudo apt install python3-lxc virtualenv sshpass bridge-utils
# ....
# Create the Virtual environment for ansible:
virtualenv -p python3 ~/.venv/ansible
source ~/.venv/ansible/bin/activate
# ....
# To install Ansible.
pip install ansible
As I’ll be using Kolla to deploy Openstack in this installation, I’ll install also in my Virtual Environment kolla-ansible (kolla-ansible==8.1.1 kolla-ansible==8.2.0 — I’ve chosen Stein version in this demo) and the Openstack CLI tools to be able to manage the Openstack Installation:
# Using the Virtual Environment from previous step:
pip install kolla-ansible==8.2.0 python-openstackclient
Bug: There is critical bug affecting due to other providers changes in the required packages this kolla-ansible version and previous ones (https://bugs.launchpad.net/kolla-ansible/+bug/1888657), but the bug fix is not released until version 8.2.1 of kolla-ansible (at the moment of this editing, it is not released yet), so a manual patch will be needed. Luckily its really easy to patch: https://opendev.org/openstack/kolla-ansible/commit/bbaa82619ee404d495ec5aef9468ecd52c5d76d3 — In our case, the file is ~/.venv/ansible/s hare/kolla-ansible/ansible/roles/common/defaults/main.yml and you only need to insert this line after line 26: PYTHONWARNINGS: “ignore::UserWarning”
    environment:
      ANSIBLE_NOCOLOR: "1"
      ANSIBLE_LIBRARY: "/usr/share/ansible"
      # The next is the new line to insert...
      PYTHONWARNINGS: "ignore::UserWarning"
    privileged: True
Caveat: Kolla-ansible doesn’t support Ubuntu 20.04. So, the containers must be Ubuntu 18.04. I’ll recomend you creating a first container manually before running these ansible playbooks because LXC downloads the base container and it installs the software using some kind of normal installation. The command is this one:
sudo lxc-create -t ubuntu -n u1 -- -r bionic
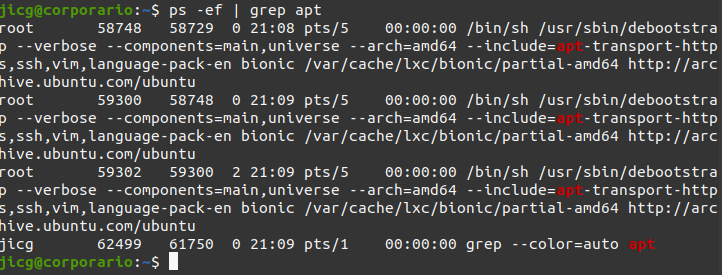
Whilst the lxc-create is running and downloading the Ubuntu packages, you can see that apt is running:
And at a certain point of the installation, it will make you questions that you’ll need to answer. If this is done for the first time using ansible, you won’t have any way to respond these questions and the installation will be stuck forever and it will never end.
Once deployed for the first time, the container will be in Cache and you won’t need to respond these questions again. So, you can answer “yes” this time and when it finish, you can destroy the container:
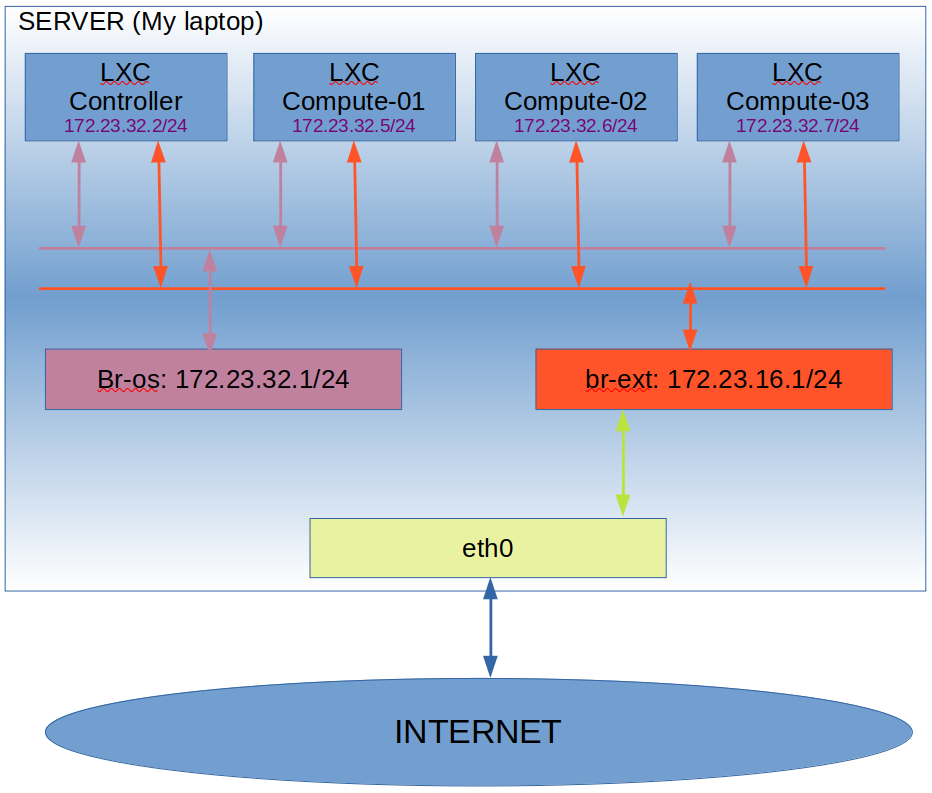
So, the big box is my server. Inside it there are 4 LXC containers connected to 2 bridges (I’ll create them in the installation). The Br-os bridge is intended as internal communication between the Openstack nodes. The br-ext bridge is intended for the communication of external VMs to the Internet. I’ve decided not to create VLANs or any other Isolation between the different networks for simplicity. However, in a production environment using real servers, these networks should be isolated for security (to prevent VMs from connecting to the Compute or Controller nodes.
The containers will be connected to the bridge br-ext using eth1 and this interface will have no IP configured. The Containers will be connected to the bridge br-os using eth2 and they’ll have an IP here in 172.23.32.0/24.
In order to create the containers, the ansible playbook named CreateLxcContainers.yaml must be run.
This playbook ensures the 2 bridges are created, they are up and they have their corresponding IP. Despite of this, it ensures a few modules are loaded, because they’ll be needed whether for ansible-kolla deployment or for the containers to run properly: – ebtables (required in ansible-kolla deployment) – tap (required in the containers to implement a proper network) – ip_vs (required in ansible-kolla deployment)
iptables -t nat -D POSTROUTING -s 172.23.16.0/24 ! -d 172.23.16.0/24 -j MASQUERADE || true
brctl addbr br-os || true
brctl addbr br-ext || true
ip addr add 172.23.16.1/24 dev br-ext  || true
ip addr add 172.23.32.1/24 dev br-os  || true
ip link set br-os up
ip link set br-ext up
iptables -t nat -A POSTROUTING -s 172.23.16.0/24 ! -d 172.23.16.0/24 -j MASQUERADE
modprobe ebtables
modprobe tap
modprobe ip_vs
After this configuration, it deploys the containers and some packets we’ll need for ansible-kolla deployment. You can see the file code in the Github repo mentioned above.
Preparing the containers
Once the containers are running, we must install some software in them to make them ready for Openstack. This is done with the playbook PrepareContainers.yml.
This playbook creates the user/group kolla and add it to the sudoers file. It adds an authorized ssh public key to ~kolla/.ssh/authorized_keys (this must be configured in file playbook/vars/containers.yaml, in the variable public_key. It is not configured with any default key.
The palybook also sets a netplan to configure networking in the container and restart the network and adds some packages that kolla installation will need.
The playbook will set up a new service which will run before the docker service starts in the LXC Container when the container boots. The service will run a script named shared-run.sh:
Make the /run directory as shared (this is needed by Kolla dockers)
Creates /dev/net/tun character device, which will provide better network performance.
Creates /dev/kvm character device so Virtual Machines can be created using KVM (instead of QEMU — emulated virtualization, much slower)
Creates /dev/vhost-net characer device to be able to create virtual networks and let the VMs to communicate between them.
Kolla-Ansible: The installation.
The installation of Kolla-Ansible is described here. However, I’m going to provide the steps in order repeat the installation I did.
As I explained before, I installed kolla ansible (Openstack Stein) in the ansible’s virtual environment. You can find kolla-ansible version here.
pip install kolla-ansible==8.1.1
First of all, we need to create the directory /etc/kolla where kolla-ansible configuration files are stored. However, I simply will create a link this way from the KollaAnsibleOnLXC directory that I’ve previously downloaded from github:
The next step is generating the Passwords for the installation (I’ve provided the passwords that I got once in one installation, but you should generate new passwords for your self). This step will overwrite the file /etc/kolla/passwords.yml with randomly generated passwords.
kolla-genpwd
Inventory
The inventory file is needed to deploy Openstack using Kolla. Of course, we must edit it before deploying Openstack. In the repository it is already provided an inventory file named multinode. It is tuned for the IPs I’m using in this demo deployment.
# These hostname must be resolvable from your deployment host
172.23.32.2 ansible_user=kolla ansible_become=true

# The above can also be specified as follows:
#control[01:03]     ansible_user=kolla

# The network nodes are where your l3-agent and loadbalancers will run
# This can be the same as a host in the control group
[network]
172.23.32.2 ansible_user=kolla ansible_become=true

[compute]
172.23.32.5 ansible_user=kolla ansible_become=true
172.23.32.6 ansible_user=kolla ansible_become=true
172.23.32.7 ansible_user=kolla ansible_become=true
.......
Kolla’s Configuration File
Now, we must consider reading and understanding the file /etc/kolla/globals.yml. In this file we’ll describe the deployment values that we want to configure for our Openstack deployment. A file tuned for our demo installation is provided in the code you could download from Git Hub.
I’m not going to describe all the parameters I used, but, at least I will describe a few parameters. Let’s start with our network interfaces:
All LXC Containers are connected in the same way to the bridges. The interface eth2 will be used for “management” and it is connected to the bridge I named br-os. They’ll have an in the network 172.23.32.0/24.
The interface eth1 will be used for the Virtual Machines to connect to the Internet. In this case, this interface is connected to br-ext. No IP Is needed here for any LXC Container. In fact, in this case, it would be enough if only the controller had this network interface.
Another parameter is
kolla_internal_vip_address: "172.23.32.254"
Which is a Virtual Interface to be used with ha-proxy. Maybe you can think it is not so interesting, but it is. In this case, no ha-proxy should be needed. But if I don’t use it, one task in kolla-ansible will wait until mariadb is ready in ha-proxy. It’ll never be ready and it will fail.
Other configurations are:
# What version of Openstack we'll be installing and the type of installation
kolla_base_distro: "ubuntu"
kolla_install_type: "source"
openstack_release: "stein"

# We'll be using rabbitmq for the communications amongst processes.
om_rpc_transport: "rabbit"

# We'll be using LinuxBridge to build networks
neutron_plugin_agent: "linuxbridge"

# The region name will be this RegionDemo:
openstack_region_name: "RegionDemo"

# The services we will use are: Keystone, glance, nova, neutron and rabbitmq
enable_openstack_core: "no"
enable_glance: "yes"
enable_haproxy: "yes"
enable_keystone: "yes"
enable_mariadb: "yes"
enable_memcached: "yes"
enable_neutron: "yes"
enable_nova: "yes"
enable_rabbitmq: "yes"

# We'll be using KVM for virtualization. Not QEMU (The default one)
nova_compute_virt_type: "kvm"
Despite all of these configurations, we will add 3 passwords (the problem these passwords are not generated with command kolla-genpwd and they are required to complete the installation:
Anyway, please, take a look to the /etc/kolla/globals.yml file and try to understand it.
Finally, the deployment
There are 3 steps to deploy ansible-kolla:
The first step is bootstrapping the LXC Containers, which is done with command:
kolla-ansible -i multinode bootstrap-servers
The second step is optional. This is used to check if everything is ready to install:
kolla-ansible -i multinode prechecks
And finally the installation. The installation will fail because some configurations can’t be applyed in the containers. There are workarounds for this, although this is not the solution I choose, anyway, you’d only need to add in your /etc/kolla/globals.yaml the line:
set_sysctl: "no"
However, I’ve modified one kolla-ansible file: ~/.venv/ansible/share/kolla-ansible/ansible/roles/neutron/tasks/config.yml ~/.venv/ansible/share/kolla-ansible/ansible/roles/neutron/tasks/config-host.yml adding the line “ignore_errors: yes” at the end of the fist task there:
The fact is that there are things that doesn’t go well, but indeed the task does other things which are useful, I mean, it sets the variables it can set and which are needed, although it can’t set them all. That’s the reason I don’t set the variable “set_sysctl” to false to prevent it from executing. I could have done so and adding the lines to the sysctl.conf in my own playbooks. I preferred this one. Anyway, up to you.
Once this little patch is appliyed, I run the deployment:
kolla-ansible -i multinode deploy
Your Openstack Installation
After the installation, you can start using you new Openstack. First you’ll need to know your admin Password:
Another thing you’ll probably want to do is adding a few lines to your /etc/hosts files. Just for convenience. Please pay attention to the controller IP. Yes, it is the same we added in the configurations for the variable kolla_internal_vip_address
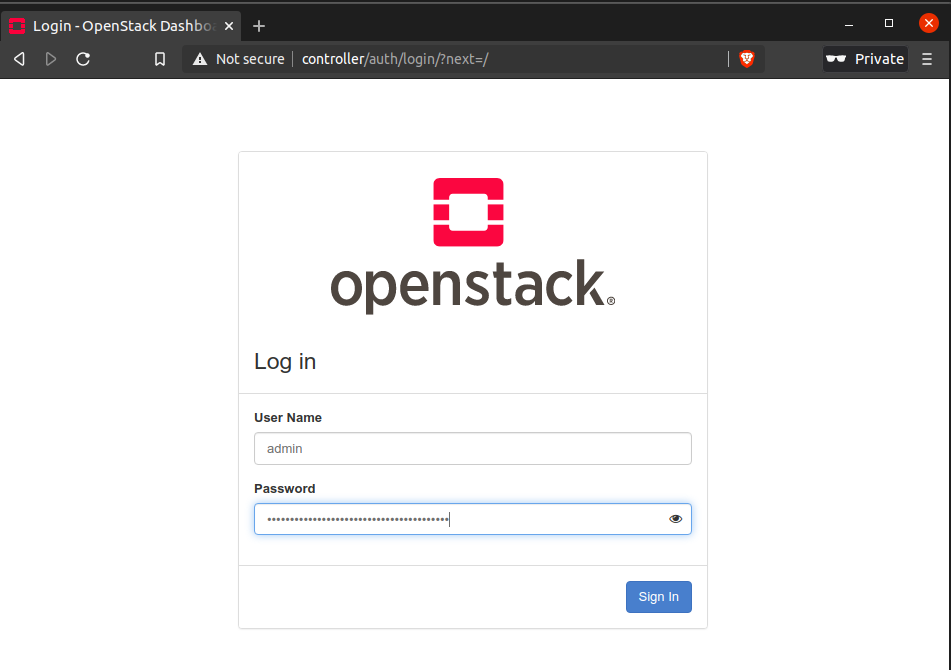
Once done that, you can start your browser to see something or your Openstack installation:
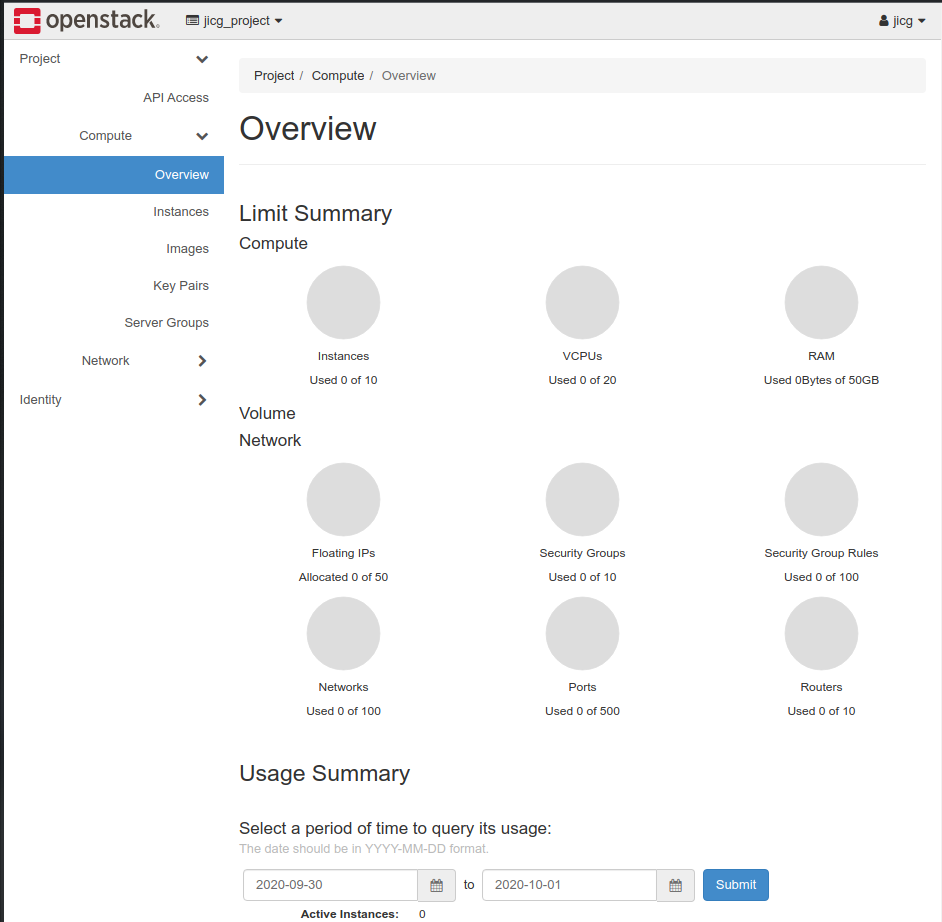
After login you’ll get in a very meaningful screen:
This screen shows the results of some queries done to Openstack in order to get the usage of resource. Openstack services are needed (so they must be properly running) to render this page without errors.
Final consideration
I’ll write soon another POST about what to do with a new and clean Installation of Openstack. This POST has grown long, but I will write a crash course to make your Openstack installation in something which can be used soon.
I wrote a post about using LXC Containers in Ubuntu 20.04. I explained there how we could install LXC and how to install Docker and how to run KVM virtual hosts. It simply works. In order to deploy Docker and Virtual Machines we had to build really unsecure containers, thus I wouldn’t use that solution in production environments. However, LXC provides me a way to test how could things be done in infrastructure just using my laptop.
Please, be aware that THIS IS NOT A PRODUCTION SOLUTION. IT IS REALLY UNSECURE. IT IS ONLY INTENDED TO SIMULATE INFRASTRUCUTRE.
Today I’ll be writing on how to deploy Kubernetes in several hosts using LXC. If I deployed several Virtual Machines I would quickly run out of memory in my laptop, however, I can test a Kubernetes installation using LXC without memory problems. In order to do that, I’ve writen a few Ansible files which helps me to deploy my Kubernetes cluster.
Prepare my server (laptop)
First of all I have to install some packages we’ll need in order to be able to run the ansible scripts I’ve coded and let Ansible do it work.
And let my user do “sudo” without password (this is for simplicity) in my own laptop adding a sudo conf file with this line:
jicg ALL=(ALL:ALL) NOPASSWD: ALL
And, as Kubernetes doesn’t work with Swap, I’ve disabled Swapping in my computer:
sudo swapoff -a
Now we are ready to start deploying our Kubernetes!!!
Create Containers using Ansible.
I will assume that the reader is familiar with ansible. There are many good Ansible introductions around. I’m not going to repeat all that again. I’m more interested in the Steps and configurations needed to Deploy a Kubernetes cluster using LXC. Let me repeat again that this is absolutely not intended for production environments but for infrastructure simulation.
First of all, the parameters needed in LXC are even more unsecure than the ones in my previous entry (see container_config) in the code bellow.
I’ve created a repo in GitHub to support this article it here. You can find there every
First of all, I create an Inventory for localhost. The containers will run in my localhost:
[local]
localhost ansible_connection=local
And I’ll configure Ansible to be able to ssh the containers without problems with security of SSH connections and all of that. This is done using the file ansible.cfg:
Here is part of the file to deploy and destroy the Containers. The containers will run Ubuntu 20.04 (Focal Fossa). You can find the complete file here:
The interesting thing here are the parameters defined in the container configuration. We need all that in order to be able to run Kubernetes inside the containers.
Once the containers are created, we can proceed with the Software installation inside each container.
Installing Dockers In the containers
Once the containers are running (it shouldn’t take too long except for the 1st container), we need to install the software in those containers. I’ve writen a helper script in python in order to create a new inventory with the containers. Please, remember that our first inventory was only the localhost. We need an inventory in order to deploy things in every single container.
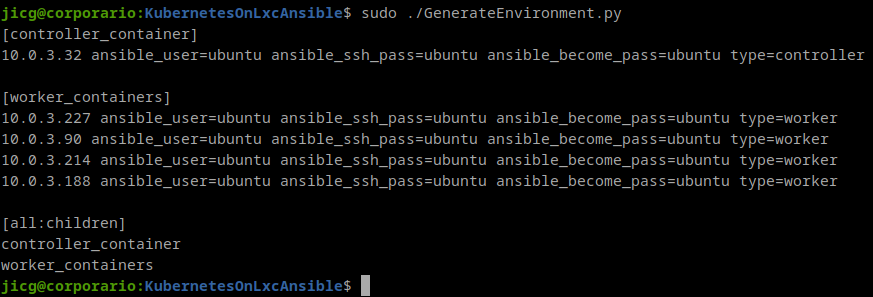
The helper script must be run with root privileges because it need to access come of the LXC Container properties. Here is an example of a run in my laptop
As you can see there is 1 group for the “controller_container” (which is 1 and only one, maybe one day I’ll extend that to HA). And another group for “worker_containers”. That inventory has some variables defined. The user, the password, and the type.
There are some interesting things here. The playbook is quite commented, so it is easy to read (I hope).
I’d like to comment that inside the containers there are problems with Kubernetes because it has no Character device /dev/kmsg. Some time ago, there was a configuration parameter (That LXC that came with Ubuntu 16.04) but it was removed since (at least) Ubuntu 18.04. That’s why there is a command crating the Character Device in the Playbook
[ -c /dev/kmsg ] || mknod /dev/kmsg c 1 11
It is only created if it doesn’t exist. So, the same playbook can be used it we want to install this software in a Virtual machine or wherever.
Install Kubernetes
Basic deployment
This is done with a third Ansible playbook. It starts initializing the Kubernetes Cluster in the Master using this command:
The advertise address is the first IP of the LXC Container (the one shown in the inventory file). And there is another parameter “k8s_extra_parameters“. This parameter must be set to let Kubernetes ignore some errors it comes throught when it runs inside a container. So, in the variables file, there is a line like this one:
If you run this Ansible playbooks in Virtual machines or somewhere out a container, the parameter can be set to an empty string (“”).
Once “kubeadm init” is finished, the configuration is copied to the user’s (ubuntu in this case) directory in .kube/config. So this user in this host will be the master of the kubernetes cluster.
networking services: Flannel and Calico:
Kubernetes will need some networking model to run. In this case I was using Flannel, since it is easy to configure and install. The only thing I had to do is writing this line:
The second step (which should be done after all the nodes are installed, see bellow) is reconfiguring the kubelet service in every node adding to the file /etc/systemd/system/kubelet.service.d/10-kubeadm.conf after the line [Service] as extra arguments the IP of the controller node:
Once the file is changed, we’ll need to restart the kubelet service:
systemctl daemon-reload
systemctl restart kubelet
And finally, the third and last step (also should be done after every node is installed) to have calico installation working, we need to remount the /sys to be mounted as shared or the calico dockers won’t run:
This 2 steps to reconfigure Kubernetes and /sys filesystem are done with the fourth ansible script. This won’t harm your installation if you use Flannel instead of Calico.
Joining nodes to the Kubernetes cluster:
The next step is joining the Worker nodes to our kubernets cluster. The way I did this is writing a script to every worker node with the result of the command:
kubeadm token create --print-join-command
So, I can run that command in every worker node and it can join the kubernetes cluster.
Finally, I’ve deployed an ingress controller to be able to access the HTTP(s) servives that I can deploy in my cluster:
Before anything, I must say that there’s a quick way to reach here: Running one script in the server (my laptop) named InstallKubernetes.sh. This command will run everything to install kubernetes (well I don’t mean it will install ansible nor set the swap off), but once the repository is cloned and you’ve got ansible configured and all of that.
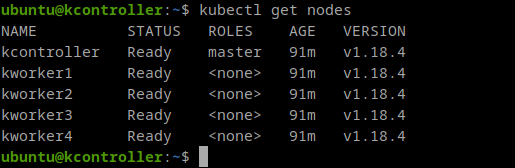
Anyway, now I can login in the controller and I can start running Kubernetes commands, for example, I can show my nodes:
I can see my Ingress service running and (in this case) listening for HTTP on port 31710 and for HTTPS on port 30667:
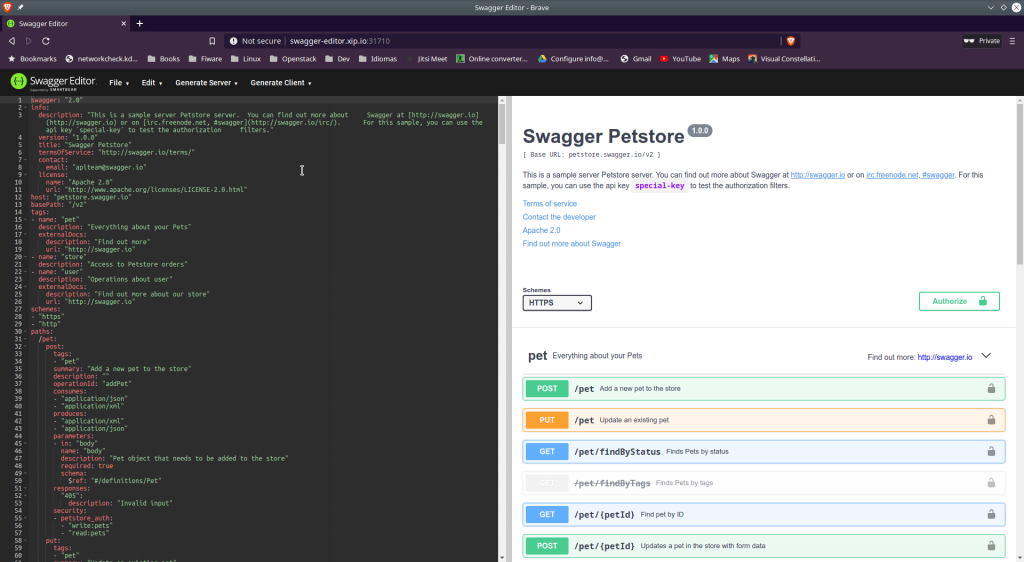
And as an example of a deployment, as I’m recently using quite often Swagger editor, I can deploy a swagger editor using this file:
I save that file as swagger-editor.yaml and I apply the changes to kubernetes:
kubectl apply -f swagger-editor.yaml
Now, I can edit /etc/hosts in my server and add a new line for the name “swagger-editor.xip.io” using the same IP address that in controller (add a line like the second one):
I’ll be able to access this new service like this:
The few Last Considerations
Maybe you could be interested in starting/stopping your Kubernetes cluster. This might not properly work because the /dev/kmsg character device is created once in the installation and won’t be created when a container restart. So, there might be problems. In order to solve these problems, I’ve added another Ansible playbook to create a service intended to run before the Kubelet service which creates /dev/kmsg on every startup.
This playbook will copy a service file (remember this is intended to work in Ubuntu 20.04) to /lib/systemd/system/kmsg-create.service and a very small script to /sbin/kmsg-mknod in every clusters node. After that, it will enable the new service kmsg-create and start it.
After the service is installed, you can safely stop and start the cluster. If you want to stop the cluster run the command:
6 months later I’ve posted this, I’ve been working with Kubernetes and testing, etc. and I’m surprised on how well it runs under LXC compared to some Virtual Servers. 4 worker nodes and one controller running a MySQL, a WordPress and a Mediawiki only takes 1.2Gb of RAM. Much less than only starting 3 Virtual Servers (1 controller and 2 workers). And everything runs rather smoothly.
It is a good tool to practice and learn. I’m sure about it.
LXC, as you can read in https://en.wikipedia.org/wiki/LXC, is an operating-system-level virtualization method for running multiple isolated Linux systems (containers) on a control host using a single Linux kernel.
Basically this means that you can have multiple containers behaving as if they were Virtual Machines. This is a different approach to Dockers, which are meant to run a single application inside. For instance, if we wanted to run a WordPress using Docker, we should run a docker for the database and another one for the HTTP server and both Docker should communicate using some networking capabilities. However, if we run the same instance using LXC, we could install the Database and the HTTP server using the same container (a kind of lightweight Virtual Machine). So, I think this is basically the biggest difference: A Docker is thought to run an application and LXC is thought to behave in a close way to a virtual machine.
Installation and first Steps
In order to install LXC we could simply run:
apt install lxc lxc-templates lxc-utils
Now, we can start working with LXC. Of course, the first thing we’d like to do is creating our first LXC Virtual Machine, in order to do this, we could type the following command:
lxc-create -t ubuntu -n u1 -- -r focal
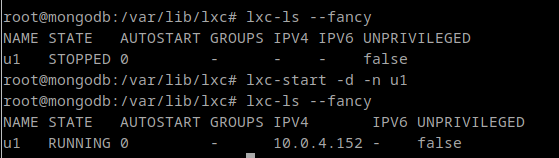
And after a while, we’ll have our container. It won’t be runing, but it will be created. The name of my container, in this case, is n1 In order to run the container we should type:
lxc-start -d -n u1
Once we are running our container, we can see it using the command “lxc-ls –fancy“:
As you can see, when the container is STOPPED, it has no IP. After the container is started, it is assigned an IP address and will use that IP address for the life of the container (until it is destroyed). By default, a bridge is created in LXC host named lxcbr0 which will act as “gateway” for the containers.
NOTE: The default network is 10.0.3.0/24 instead of 10.0.4.0/24 in the example. It doesn’t matter much at this point.
Two other interesting commands to work with containers are: lxc-stop to stop a container and lxc-destroy to definitely remove the container (forever):
# Stop a running container
lxc-stop -n u1

# Remove a stopped container
lxc-destroy -n u1
Configuration of Containers
Once the container is created, a new directory is created in /var/lib/lxc with the name of our container. In our example, the directory will be /var/lib/lxc/u1.
There is a config file in that directory named config. We can change the configuration of the container here. There are plenty of different configurations which can be done here.
The default configuration is enough to run most applications. However, there are some things that might require to change this configuration. For example: Running nested LXC Containers or Dockers, running Virtual Machines using KVM…
If we wanted to run these kind of applications, we must add the following lines to the end of the config file:
lxc.apparmor.profile = unconfined
lxc.cgroup.devices.allow = a
lxc.cap.drop =
In my example, I’m running LXC in LXC. So this is the reason the IPs of my examples are 10.0.4.0/24 instead of 10.0.3.0/24.
Running Docker inside LXC
I run a new container (this time it won’t be nested):
lxc-create -n docker-in-lxc -t ubuntu
And I add the lines shown above to the end of its config file: /var/lib/lxc/docker-in-lxc/config and I start the container with lxc-start.
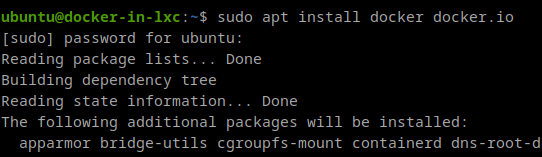
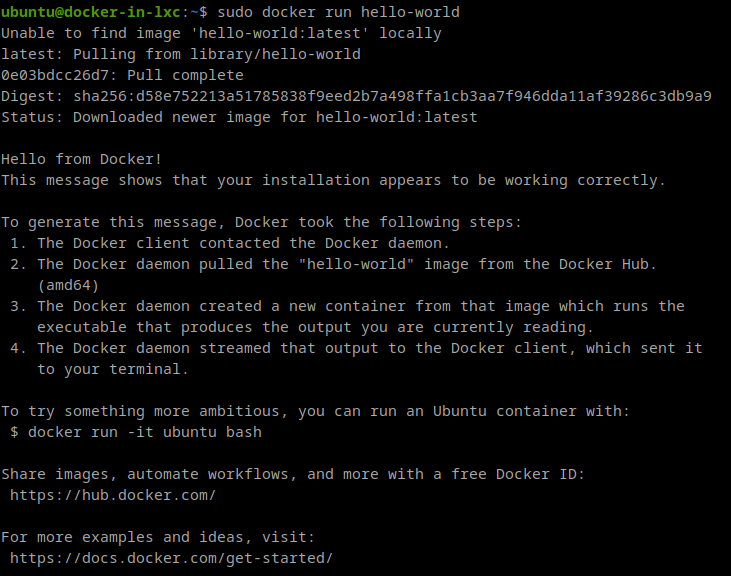
I log in the container and I run the command
sudo apt install docker docker.io
Once everything is installed, we can test if it works:
KVM In LXC
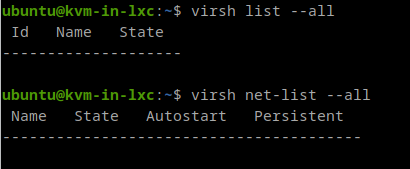
Again, we create another lxc container changing its config file as explained above and we can ssh to that container.
Once it gets installed, our libvirt will be there.
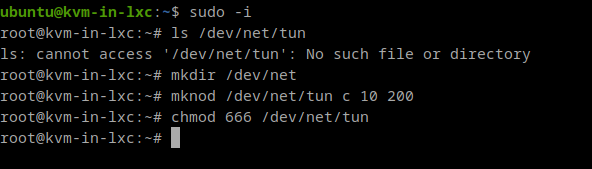
Before we can do anything with this, we’ll need to create a device driver which is not present by default in our LXC. The /dev/net/tun which is a must in order to run our Virtual machines with networking:
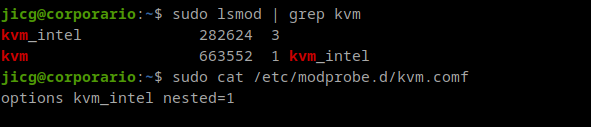
We also need to be aware that Kernel Modules are not loaded inside the LXC containers. Modules are loaded in the Kernel and the Kernel is shared for every LXC container. So, if we want virtualization to work, we’ll need the KVM Module loaded in the real Linux Kernel: We need kvm installed in our real operating system.
It is not mandatory to have nested virtualization configured in our module. But anyway, I have it.
Once the image is downloaded, I will start a new VM using that image. However, it is a cloud based image which will try to connect to 169.254.169.254 in order to get cloud metadata information. As I don’t have any cloud provider such as openstack, booting a Virtual Machine from this image will take a long, long time. In order to make all this to fail faster, I’m going to add the ip 169.254.169.254 to device eth0 inside the container:
First of all, It is 17th February 2020. This means that Ubuntu Focal Fossa is not ready. We’ll have to wait for another 2 months before the new Ubuntu 20.04LTS is released. This is OS is not stable yet, so it is not recomended: There might be bugs, problems can be expected, etc.
I have a Macbook PRO 2016 13″ which I hardly use. However, just for fun I installed a new Ubuntu 20.04 Foca Fossa and it is working reasonably well. I have WIFI, the keyboard and trackpad works perfectly from scratch. I’m happy with it.
There are a few things that doesn’t work: Bluetooth, sound and Video Camera. The truth is that I really don’t care much about Bluetooth and Camera since this is a makeshift solution while HP technical service solves some problems with my HP laptop’s battery. However, I’d like to have some music while I’m working. I just bought an adaptor USB-C to Jack for less than 10€ and I can listen .
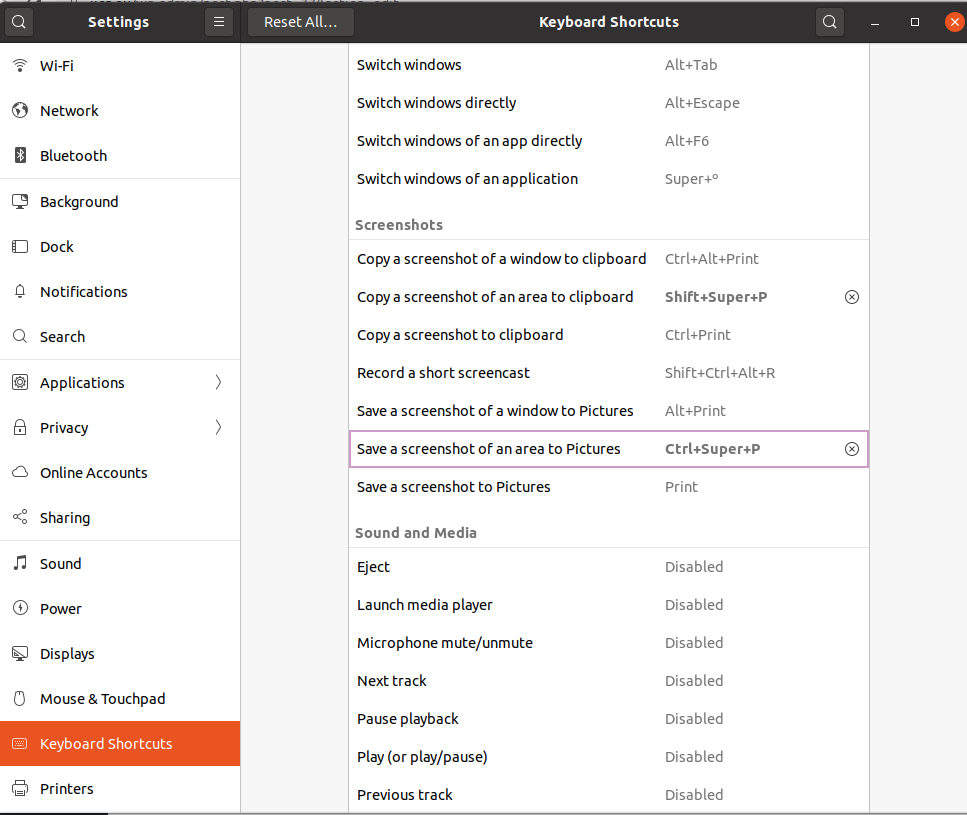
F-Keys Not Working Properly
However, there is something I didn’t like: When I pressed any F-keys the behavior was not the one I desired. Instead of acting like an F-Key, it happened turn my volume up or down and all that stuff I want to do when I press “fn”+Fx.
There is an interesting feature in Linux: The implementation of Logical Volumes using LVM (Logical Volume Manager). This implementation manages 3 concepts:
Physical Volumes, corresponding, basically, to physical disks or partitions.
Volume Groups which are an agregation of several Physical Volumes.
Logical Volumes which resembles disk partitions and which are contained in a Volume Group.
Let’s consider a simple example. Let’s imagine we have 2 disks which are named in Linux with /dev/sdb and /dev/sdc and /dev/sdd
We can convert those 2 volumes in Physical Volumes to LVM using the pvcreate command. This commands initializes a physical volume (PV) so it can be recognized to be used by LVM.
Great, we can check our PVs using the command pvscan.
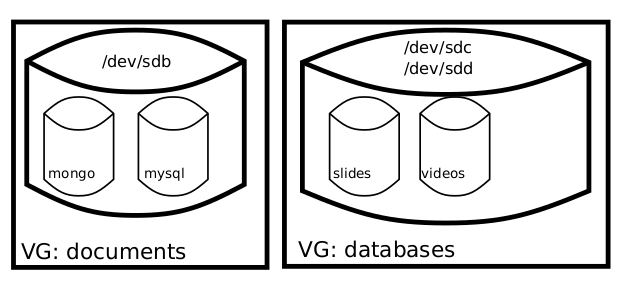
Once we’re done with this initialization, we’d like to create some new groups of volumes. In this case, I’ll create the groups named “databases” and “documents” (or whatever valid names you can think of) using the command vgcreate.
So, now we have 2 Volume Groups (VG): documents and databases
Using the command vgs we can get some basic information about our Volume Groups:
There’s only one step before we can use our disks: Creating the Logical Volumes (LV) using the command lvcreate. So, let’s do:
# Create a LV for Mongo. 25% del VG databases
sudo lvcreate -l 25%VG -n databases/mongo

# Create a LV for MySQL, 3Gb (Look the equivalent syntax with -n)
sudo lvcreate -L 3G -n mysql databases

# Another 2 LVs for videos and presentations in VG documents
sudo lvcreate -L 10G -n documents/videos
sudo lvcreate -l 20%VG -n documents/presentations
Now we have our Logical volumes in our Volume Groups… One day I’ll learn about drawing good graphics… but not today.
We can see what we have using lvs command:
Using the Logical Volumes
Yes, it is great to have logical volumes… if we could use them. In fact it is easy to use them and mount them at startup. LVM is a device mapper, this means that this Logical Volumes that we have created are mapped as devices in /dev/mapper:
We should format the devices:
for a in databases-mongo  databases-mysql  documents-slides  documents-videos; do
sudo mkfs -t ext4 /dev/mapper/${a}
done
So the devices are ready to be used, and mount them. Let’s mount a couple of those Logical Volumes by adding a couple of lines in our /etc/fstab file:
After adding these 2 lines, we can mount the directories:
sudo mkdir /var/lib/mongodb /var/lib/mysql
sudo mount /var/lib/mongodb
sudo mount /var/lib/mysql
The only thing left to do is installing MongoDB and mysql:
sudo apt install mongodb-server mysql-server
Problem with mysql
I had a problem starting mysql after the installation. I had to remove everything in /var/lib/mysql and initialize the database again:
rm -rf /var/lib/mysql/*
mysqld --initialize
That’s it. One day I’ll write something else about lvm, on how to extend the Volume Groups and the Logical Volumes, snapshots and some more interestings operations with LVM.